



前言
还是上次重装系统的后遗症。系统准备好后,一系列的软件重装和配置。重装claude code之后,一些列的 plugins、mcp、skills一个个查找和安装实在令人身心俱疲。而且在后续开发时,又一次被windows 的文字编码恶心到。
“把开发环境装进 ‘ 移动硬盘 ’:随时启动,换电脑 (换系统) 也能无缝继续开发工作?” 由于之前一直中意 wsl ,而且比较熟悉,便决定使用 wsl,自动忽略 docker。
安装基本依赖
安装 WSL
这一切都基于 WSL ,而且由于 WSL 是微软的产品,不受复杂的网络环境的影响。光这一点,就是巨大的优势,可以甩 docker 十八条街。
wsl 的安装步骤以及更多好玩功能的文档可参考微软官方网站:Install WSL。以下命令均在 cmd 或者 powershell 中执行。
启用 wsl 命令:
wsl --install
执行命令之后可能需要重启电脑,此时 wsl 安装成功。接下来,可以查看有哪些可用的 linux 发行版:
wsl.exe --list --online
我们选择安装最新的 ubuntu, 可执行下方命令:
wsl.exe --install Ubuntu-26.04
上述步骤执行完毕之后,就已经完成了 wsl + ubuntu linux subsystem。此时的 wsl 应该已经默认是 wsl2了。wsl2 比 wsl 多很多实用的功能,比如硬件直通等,相关内容可查看:使用WSL硬件直通直接调用显卡微调模型。
更多请查看:WSL DOCUMENTATION
安装基本依赖
通过以下命令会安装比较完整的基础开发依赖,比如 gcc, g++, make, git 以及一些基本的头文件等等。
sudo apt update
sudo apt install build-essential cmake ninja-build git pkg-config gdb
配置网络代理
为了规避国内的复杂网络环境,方便后续步骤的进行,需要使用代理。但是,wsl 无法直接使用 windows 的代理网络。对于 windows, wsl 中的 linux 系统就是“同个网络下的另一台物理电脑”。 wsl 若想使用 windows 的代理,需要通过软件的 “代理共享” 功能。
大致使用步骤如下:
WSL 查看 windows ip并设置代理:
cat /etc/resolv.conf
此命令可以看到 Windows 网关的输出,如:
# This file was automatically generated by WSL. To stop automatic generation of this file, add the following entry to /etc/wsl.conf:

# [network]

# generateResolvConf = false

nameserver 172.17.48.1
如 nameserver 172.17.48.1 , 那么 Windows 地址就是:172.17.48.1, 那么代理地址就是 172.29.64.1:10808 (端口号看你使用的软件以及自己的设置),这个地址似乎是固定的,因此我们可以将其写入 ~/.bashrc 。
echo 'export http_proxy=http://172.29.64.1:10808' >> ~/.bashrc

echo 'export https_proxy=http://172.29.64.1:10808' >> ~/.bashrc
source ~/.bashrc
我经过多次重启系统,以及 wsl , 它都没有改变。但是就网络以及GPT的说法,这个网关地址并不固定,可能变换,就这种情况,可以采用下面的写法。具体选择哪种,请根据实际情况选择:
cat >> ~/.bashrc <<'EOF'

export host_ip=$(grep nameserver /etc/resolv.conf | awk '{print $2}')

export http_proxy=http://$host_ip:10808

export https_proxy=http://$host_ip:10808

export HTTP_PROXY=$http_proxy

export HTTPS_PROXY=$https_proxy

EOF
source ~/.bashrc
Windows设置代理网络:
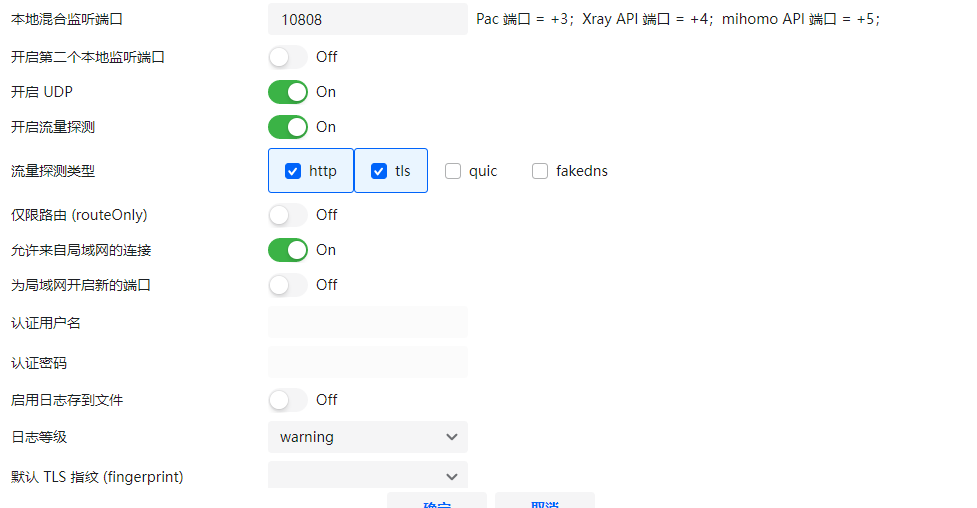
根据不同的软件,有不同的设置,但需要注意的是,部分软件需要开启 允许来自局域网的连接 。此时,WSL 已经可以正常使用网络。我们可以进行测试,如果配置正常,你可以看到google首页的源码:
curl https://google.com
正常输出:
StatusCode : 200

StatusDescription : OK

Content : <!doctype html><html itemscope="" itemtype="http://schema.org/WebPage" lang="zh-CN"><head><meta con

tent="text/html; charset=UTF-8" http-equiv="Content-Type"><meta content="/images/branding/googleg/1

x/...

RawContent : HTTP/1.1 200 OK

Content-Security-Po
安装 Claude Code 等软件
正常情况下,可以通过以下命令安装 Claude Code 的桌面版本和 CLI 版本。安装完成后,即可使用命令 claude-desktop 以及 claude 进行使用。至于如何跳过登录,配置第三方的api,可参考:配置方法
Claude Code (desktop):
curl -fLO "https://downloads.claude.ai/claude-desktop/apt/stable/$(curl -s "https://downloads.claude.ai/claude-desktop/apt/stable/dists/stable/main/binary-$(dpkg --print-architecture)/Packages" | grep '^Filename: pool/main/c/claude-desktop/claude-desktop_' | sort -V | tail -n 1 | cut -d' ' -f2)"
Claude Code (cli):
curl -fsSL https://claude.ai/install.sh | bash
如果因为节点问题,无法通过上述命令安装,可手动下载文件后安装:
- claude code desktop: https://pan.quark.cn/s/84ae1f3d60d7 下载后使用deb 安装命令安装 sudo apt install ./claude-desktop_1.24012.9_amd64.deb, 输入 claude-desktop 命令即可使用
- claude code cli: https://pan.quark.cn/s/4b01b4a340d5 下载后将其添加到path中,驶入 claude 命令使用
Codex:
codex 目前没有官方的 linux 版本,但是有非官方版本。根据仓库描述,是通过macOS版本修改而来。具体安装方式可查看仓库 codex-desktop-linux。由于我使用claude code cli较多,对其无甚兴趣。请自行查看使用方式
Vs Code:
参考官方安装步骤即可:Vs Code Linux
安装 Chrome
由于 claude code desktop / codex /vs code 都是使用浏览器登录跳转( OAuth 2.0 Authorization Code Flow)的,需要使用 Chrome。但如果不在 wsl 中安装Chrome ,会调用windows中的 chrome 其他浏览器,这种情况会在登陆后,wsl中的 claude code desktop / vscode 等却无法收到通知。
步骤 1: 进入 temp 文件夹
cd /tmp:切换当前工作目录到 /tmp 文件夹。
步骤 2: 使用 wget 下载 Google Chrome 安装包
wget https://dl.google.com/linux/direct/google-chrome-stable_current_amd64.deb
步骤 3: 安装 Google Chrome
sudo dpkg -i google-chrome-stable_current_amd64.deb
使用 dpkg 工具安装 当前稳定版本Google Chrome。(可能会导致依赖关系问题)
步骤 4: 修复依赖关系 问题
sudo apt install --fix-broken -y
步骤 5: 再次配置 Google Chrome
sudo dpkg -i google-chrome-stable_current_amd64.deb
处理浏览器登录跳转( OAuth 2.0 Authorization Code Flow)
如果不进行任何处理,会出现问题:wsl和windows都安装了chrome,在wsl安装的vs code中登录时候却调用了windows的chrome,导致登录后无法跳回wsl中的vscode(其他的 app 同理)
WSL 里的 VS Code(通常是 Remote - WSL 模式)登录时,VS Code 会调用 Linux 的 xdg-open 打开浏览器。但 WSL 的 xdg-open 默认会通过 WSLg/Windows interop 把请求转给 Windows,所以实际打开的是 Windows Chrome。
登录完成后,OAuth 回调地址(例如 vscode://...)又被 Windows Chrome 处理,结果它不知道如何回到 WSL 里的 VS Code。
查看使用过的是哪个 chrome
which google-chrome
手动设置默认浏览器(注册默认程序)
xdg-settings set default-web-browser google-chrome.desktop
mkdir -p ~/.config
cat /usr/share/applications/google-chrome.desktop | head
cat > ~/.config/mimeapps.list <<'EOF' [Default Applications] x-scheme-handler/claude=com.anthropic.Claude.desktop x-scheme-handler/http=google-chrome.desktop x-scheme-handler/https=google-chrome.desktop text/html=google-chrome.desktop x-scheme-handler/vscode=code.desktop x-scheme-handler/claude-cli=claude-code-url-handler.desktop EOF
注册share协议:
xdg-mime default code.desktop x-scheme-handler/vscode
修改配置实现 xdg-open 跳转(创建 xdg-open自己的 wrapper)
mkdir -p ~/bin
nano ~/bin/xdg-open
内容:
#!/bin/bash

case "$1" in
    vscode://*)
        /usr/bin/code "$1"
        ;;

    claude://*)
        /usr/bin/claude-desktop "$1"
        ;;

    http://*|https://*)
        /usr/bin/google-chrome "$1"
        ;;

    *)
        /usr/bin/google-chrome "$@"
        ;;
esac
保存后,为其添加执行权限并加入 path:
chmod +x ~/bin/xdg-open
echo 'export PATH=$HOME/bin:$PATH' >> ~/.bashrc
source ~/.bashrc
处理完成之后,就可以在 wsl 正常登录 claude code 等程序了,后续安装的其他程序如果也使用 OAuth 登录,重新走上放流程即可。可查看效果视频:
安装claude code plugins/mcp/skills
只需按照对应仓库的安装方式即可。推荐以下 plugins/mcp/skills:
- superpowers: https://github.com/obra/superpowers
- ui-ux-pro-max-skill: https://github.com/nextlevelbuilder/ui-ux-pro-max-skill
- Chrome DevTools for agents: https://github.com/ChromeDevTools/chrome-devtools-mcp
- 更多 skills : Awsome Claude Skills
处理桌面程序中文乱码
中文显示成「□□□」通常不是编码问题,而是 Linux 环境缺少中文字体。WSL的 GUI 程序(比如 Claude Desktop、VS Code、Linux GUI App)使用的是 WSL 里的字体库。我们只需要安装字体后重启 wsl 就行了就行了。
sudo apt update
sudo apt install fonts-noto-cjk fonts-noto-cjk-extra -y
fc-cache -fv
将WSL打包备份,装进口袋
导出导入
打包 wsl 的 ubuntu 时,需要先将运行的wsl关闭,然后再进行后续的工作。
wsl --shutdown
创建备份文件夹
mkdir D:\WSL
查看wsl名称
wsl -l -v
将wsl备份到文件夹
注意命令中的 Ubuntu, 这里需要根据 wsl -l -v 的结果来变化,如果是 Ubuntu-26.04, 则这里需要做对应的修改。 导出时间跟wsl的大小相关,装的内容越多,使用时间越长,则tar文件越大,导出耗时越长。
wsl --export Ubuntu D:\WSL\ubuntu.tar
重新导入
导入时,可以指定导入后的虚拟磁盘位置,导入命令为 wsl --import <system name after imported> <virtual disk path> <tar path> --version 2
其中:
- system name after imported:导入后这个系统的名字,可以通过 wsl -l -v 命令查看;
- virtual disk path:导入后这个系统所在的虚拟磁盘位置;
- tar path:我们导出的系统备份;
wsl --import Ubuntu D:\WSL\Ubuntu D:\WSL\ubuntu.tar --version 2
处理重新导入后的权限问题
wsl --import 后默认可能进入 root 用户,我们如果要用创建时候的用户身份,则可以按下述步骤处理:
启动:
命令中的 Ubuntu 根据实际情况修改
wsl -d Ubuntu
查看你的用户名:
ls /home
假设你的用户名是:elias,记住。
退出
exit
然后再打开powershell
ubuntu config --default-user elias
之后就可以愉快地使用 ubuntu 中的claude code / vs code了。后续如果将备份拷贝到了其他电脑,或者重装系统。只需要重新把备份导入 wsl 就行了。
Comments 1 条评论
本文将详细介绍如何在 WSL(Windows Subsystem for Linux)环境中安装并配置 Claude Code 等工具,使其达到可正常登录和使用的状态。同时,还会讲解 WSL 实例的导出、备份与重新导入流程,快速迁移和恢复完整的开发环境。
It’s a walk-through to show our readers how to install and configure tools like Claude Code in a WSL (Windows Subsystem for Linux) environment, from initial setup to successful login and usage. It also explains how to export, back up, and restore WSL instances, making it easier to migrate and recover a complete development environment.