
启
这篇文章的起点来自于微信群。我们这个群里的小伙伴们各个都长得好看、说话又好听,而且还特别好看。
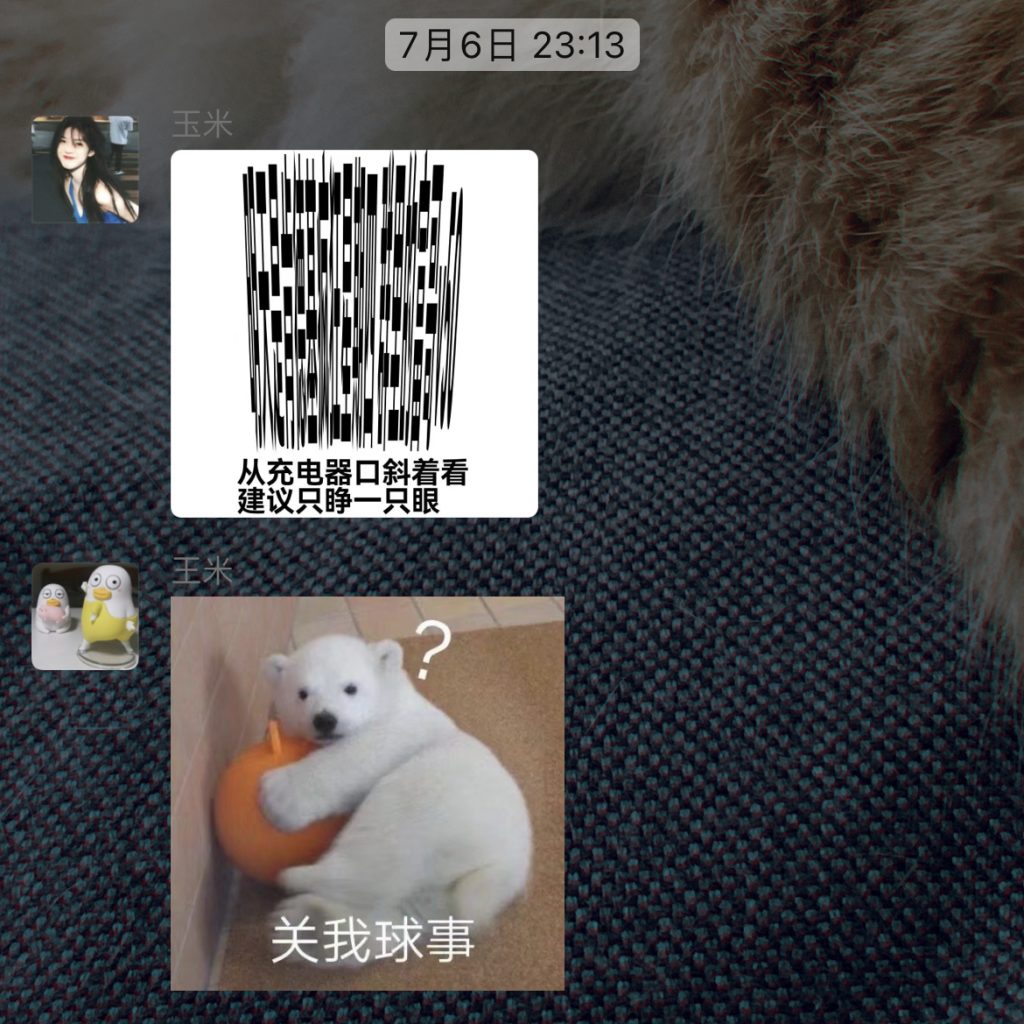
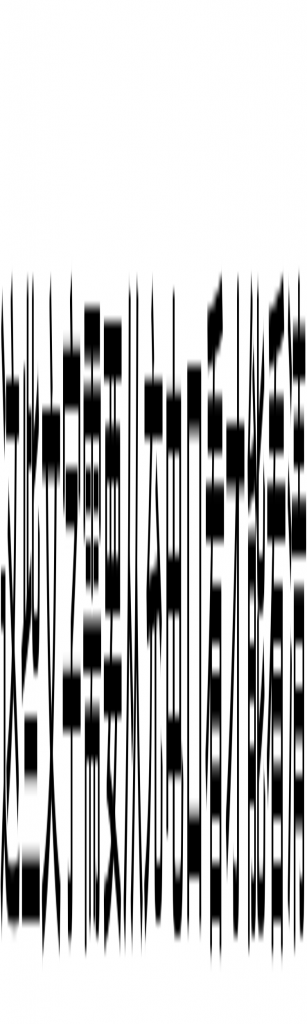
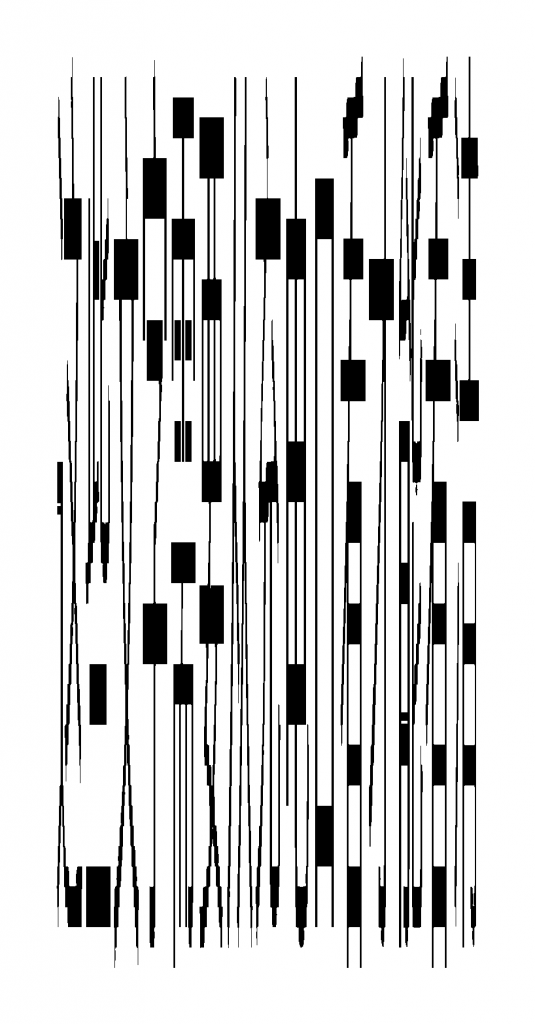
文字变形的图片如下图,如果我们按照其指引——“从手机充电口斜着看”,那么我们可以看到这些黑色色块和线条会“逐渐组合”成文字:肯德基疯狂星期四,群里富哥V50。

分析
这引起了我的兴趣。搜索关键词“从充电口看的图片”,从结果看,这种图片很久之前就开始在网络上流行,近期出现的次数又多了起来。那么这种图片怎么制作呢?
我们可以尝试分析一下原理

Graph1 描述了我们从手机充电口方向看向屏幕文字的场景 ,其中蓝色线条为屏幕中的文字,绿色线条为文字在我们眼中的象。
为了更好的分析问题,我们将其转换为Graph2 中的模型。注意:红色线条长度相等,蓝色线条长度也相等。同样的,我们可以假设这些线条是屏幕中的文字,其长度可以理解为文字字号大小。 观察两条红色线条,我们可以发现,当相同长度大小的文字,在旋转一定角度后,会造成其投影的变小,即我们看到会被从较大的字号挤压成较小字号,挤压方向与视线方向相同。
屏幕旋转 或 观察者主动改变观察角度 都会造成 的字体的象被挤压,挤压程度与观察的角度Ω有关,相关系数为sin Ω。
那么,我们有如下逻辑链条:
- 屏幕正常展示文字 ----> 以一定角度查看文字 ---> 看到被挤压的文字 (挤压);
- 以一定角度查看文字 ----> 看到正常的文字 ----> 屏幕拉伸展示文字 (拉伸);
也就是说,我们如果需要从充电口看屏幕看到(看清)正常的文字,那么屏幕在展示时就需要将文字拉伸。且根据上文,如果我们有要求屏幕所展示的被拉伸过的文字要观察者以特定的倾角才看看清,那么久需要将文字拉伸为原尺寸的 sinΩ 倍 (Graph 3 | Graph 4 所示)。
即:为了达到效果,我们需要做如下的工作:
- 将文字拉伸;
- 在拉伸文字的同时,保持文字清晰;
实操
其实,经过分析,知道原理之后,我们可以直接用ps完成这项工作。但奈何我用ps的经验停留在了CS4版本。那么我们可以用代码来实现。
注意:百度或者微信搜索出来的教程也都是用ps来完成,如果感兴趣,可以搜索相关的教程。对于此问题,个人比较推荐使用微信搜索关键字“从充电口才能看清的图片”。
开工
# - * - coding:utf-8 - * -
#  作者:Elias Cheung
#  编写时间:2022/7/12  14:43
from PIL import Image, ImageFont, ImageDraw
from typing import Union, List, NewType
from datetime import datetime
from math import ceil, floor

Picture = NewType("Picture", Image)


def draw_text(text: str, font_family: str, font_size: int = 50,
              text_color: Union[str, tuple] = (0, 0, 0), location: tuple = None,
              bg_color: Union[str, tuple] = "white") -> List[Picture]:
    """
    :param location: location on image where the text would be written onto, if None, it will be reset to(0,2*font_size)
    :param font_family: src of ttf file (win or mac), or name of built-in fonts(ios);
    :param text: text that you want to draw;
    :param text_color: text color, in pattern (r, g, b) or string white, green, ..., e.t.c.;
    :param font_size: font size;
    :param bg_color: canvas color, in pattern (r, g, b) or string white, green, ..., e.t.c.;
    :return: 2 picture in a list; twisted one (1st) and just-crop one (2nd);
    """
    print(f"【{datetime.now()}】创建画板")
    print(f"【{datetime.now()}】开始绘制正文")

    font = ImageFont.truetype(font_family, font_size)
    image = Image.new(mode="RGB", size=(len(text) * font_size, len(text) * font_size), color=bg_color)

    draw = ImageDraw.Draw(image)
    location = (0, 2 * font_size) if location is None else location
    draw.text(location, text, fill=text_color, font=font)

    crop_image = image.crop((0, int(1.8 * font_size), len(text) * font_size, int(3.2 * font_size)))
    twisted_image = crop_image.resize(size=(ceil(len(text)) * font_size, 50 * font_size))

    print(f"【{datetime.now()}】正文绘制完毕")
    return [twisted_image, crop_image]


def refine_drew_text_image(image: Picture, font_size: int = 50,
                           text_color: Union[str, tuple] = (0, 0, 0),
                           bg_color: Union[str, tuple] = (255, 255, 255)) -> Picture:
    """
    :param text_color: text color, in pattern (r, g, b) or string white, green, ..., e.t.c.;
                       MUST BE THE SAME COLOR AS THE ONE YOU USED TO DRAW TEXT WITH FUNCTION draw_text();
    :param bg_color: text color, in pattern (r, g, b) or string white, green, ..., e.t.c.;
                     MUST BE THE SAME COLOR AS THE ONE YOU USED WITH FUNCTION draw_text();
    :param image: image to be refined, come from function draw_text();
    :param font_size: MUST BE EQUAL TO THE FONT SIZE USED IN FUNCTION draw_text();
    :return: refined picture
    """

    print(f"【{datetime.now()}】开始优化图片")
    #  核心部分,
    for w in range(image.width):
        for h in range(image.height):
            r_, g_, b_ = image.getpixel((w, h))
            _r, _g, _b = text_color
            if (r_, g_, b_, 0) != (_r, _g, _b, 0):
                image.putpixel((w, h), bg_color)

    print(f"【{datetime.now()}】准备输出优化效果图")
    new_image = Image.new(mode="RGB", size=(45 * font_size, 100 * font_size), color=bg_color)
    new_image.paste(image, (18 * font_size, 0))

    print(f"【{datetime.now()}】计算输出效果图边界尺寸")
    coordinates_y, coordinates_x = list(), list()
    for w in range(new_image.width):
        for h in range(new_image.height):
            r_, g_, b_ = new_image.getpixel((w, h))
            if (r_, g_, b_) != (255, 255, 255):
                coordinates_y.append(h)
                coordinates_x.append(w)

    text_start_y = min(coordinates_y)
    text_end_y = max(coordinates_y)
    text_start_x = min(coordinates_x)
    text_end_x = max(coordinates_x)

    crop_box = (text_start_x - 2 * font_size,
                text_start_y - 2 * font_size,
                text_end_x + 2 * font_size,
                text_end_y + 2 * font_size)
    print(f"【{datetime.now()}】确定新边界", crop_box)

    new_image = new_image.crop(crop_box)
    return new_image


def concatenate_images(*images: Picture, strategy: str = "MAX",
                       bg_color: Union[str, tuple] = (255, 255, 255)) -> Picture:
    """
    :param bg_color: background color used as concatenated images; better be THE SAME as used in draw_text() and
                    refine_drew_text_image()
    :param images: one or more image(s) to be concatenated
    :param strategy: MAX or MIN, if MAX, concatenated picture's WIDTH will be set to the LARGEST width of image in image
                    tuple, vice versa;
    :return: concatenated picture
    """
    images: tuple = images
    images_width = [image.width for image in images]
    images_height = [image.height for image in images]

    max_width, min_width = max(images_width), min(images_width)

    new_image_height = sum(images_height) + 50
    new_image_width = max_width if strategy == "MAX" else min_width

    images = tuple(map(lambda img: img.resize(size=(new_image_width, floor(new_image_width * img.height / img.width))),
                       images))

    new_image = Image.new(mode="RGB", size=(new_image_width, new_image_height), color=bg_color)

    current_y = 0
    for image in images:
        new_image.paste(image, (0, current_y))
        current_y += image.height

    return new_image


if __name__ in "__main__":
    lyris = "生成从充电口才能看清的图片"
    string = "闭上一只眼看从充电口哦"
    font_src = "w6.ttf"  # pc/mac 可用ttf文件的路径替代,ios可使用系统中已安装的字体,输入名称即可

    pic = draw_text(text=lyris, font_family=font_src)
    pic[0].show()
    print("上图为中间临时产物,优化中,请耐心等待结果~")

    mod_pic = refine_drew_text_image(pic[0])
    mod_pic.show()

    hint = draw_text(text=string, font_family=font_src)

    last = concatenate_images(pic[0], hint[1], strategy="MAX")
    last.show()
    last.save(f"{lyris}_{datetime.now()}.png")
解析
draw_text()
def draw_text(text: str, font_family: str, font_size: int = 50,
              text_color: Union[str, tuple] = (0, 0, 0), location: tuple = None,
              bg_color: Union[str, tuple] = "white") -> List[Picture]:
    """
    :param location: location on image where the text would be written onto, if None, it will be reset to(0,2*font_size)
    :param font_family: src of ttf file (win or mac), or name of built-in fonts(ios);
    :param text: text that you want to draw;
    :param text_color: text color, in pattern (r, g, b) or string white, green, ..., e.t.c.;
    :param font_size: font size;
    :param bg_color: canvas color, in pattern (r, g, b) or string white, green, ..., e.t.c.;
    :return: 2 picture in a list; twisted one (1st) and just-crop one (2nd);
    """
    print(f"【{datetime.now()}】创建画板")
    print(f"【{datetime.now()}】开始绘制正文")

    font = ImageFont.truetype(font_family, font_size)
    image = Image.new(mode="RGB", size=(len(text) * font_size, len(text) * font_size), color=bg_color)

    draw = ImageDraw.Draw(image)
    location = (0, 2 * font_size) if location is None else location
    draw.text(location, text, fill=text_color, font=font)

    crop_image = image.crop((0, int(1.8 * font_size), len(text) * font_size, int(3.2 * font_size)))
    twisted_image = crop_image.resize(size=(ceil(len(text)) * font_size, 50 * font_size))

    print(f"【{datetime.now()}】正文绘制完毕")
    return [twisted_image, crop_image]
draw_text() 的主要作用是生成一张 初步扭曲的图片 和 经过裁切但未拉伸扭曲的图片。
- 初步扭曲的图片:经过此步骤处理,我们可以看到已经可以看到效果,但图片显得很脏,还需要进一步处理;
- 经过裁切但未拉伸扭曲的图片: 主要用来生成正常展示的提示文案;
refine_drew_text_image()
优化上游产生的图片
def refine_drew_text_image(image: Picture, font_size: int = 50,
                           text_color: Union[str, tuple] = (0, 0, 0),
                           bg_color: Union[str, tuple] = (255, 255, 255)) -> Picture:
    """
    :param text_color: text color, in pattern (r, g, b) or string white, green, ..., e.t.c.;
                       MUST BE THE SAME COLOR AS THE ONE YOU USED TO DRAW TEXT WITH FUNCTION draw_text();
    :param bg_color: text color, in pattern (r, g, b) or string white, green, ..., e.t.c.;
                     MUST BE THE SAME COLOR AS THE ONE YOU USED WITH FUNCTION draw_text();
    :param image: image to be refined, come from function draw_text();
    :param font_size: MUST BE EQUAL TO THE FONT SIZE USED IN FUNCTION draw_text();
    :return: refined picture
    """

    print(f"【{datetime.now()}】开始优化图片")
    #  核心部分,
    for w in range(image.width):
        for h in range(image.height):
            r_, g_, b_ = image.getpixel((w, h))
            _r, _g, _b = text_color
            if (r_, g_, b_, 0) != (_r, _g, _b, 0):
                image.putpixel((w, h), bg_color)

    print(f"【{datetime.now()}】准备输出优化效果图")
    new_image = Image.new(mode="RGB", size=(45 * font_size, 100 * font_size), color=bg_color)
    new_image.paste(image, (18 * font_size, 0))

    print(f"【{datetime.now()}】计算输出效果图边界尺寸")
    coordinates_y, coordinates_x = list(), list()
    for w in range(new_image.width):
        for h in range(new_image.height):
            r_, g_, b_ = new_image.getpixel((w, h))
            if (r_, g_, b_) != (255, 255, 255):
                coordinates_y.append(h)
                coordinates_x.append(w)

    text_start_y = min(coordinates_y)
    text_end_y = max(coordinates_y)
    text_start_x = min(coordinates_x)
    text_end_x = max(coordinates_x)

    crop_box = (text_start_x - 2 * font_size,
                text_start_y - 2 * font_size,
                text_end_x + 2 * font_size,
                text_end_y + 2 * font_size)
    print(f"【{datetime.now()}】确定新边界", crop_box)

    new_image = new_image.crop(crop_box)
    return new_image
refine_drew_text_image() 的作用是将draw_text() 生成的图片进行优化。将其变得干净清晰。draw_text() 生成的图片“显得脏”是因为图片进行拉伸操作时,会增加与字体颜色和背景不同的颜色。
那么,优化逻辑就显而易见了,就是遍历 draw_text() 生成的图片的每个像素。将颜色与文字最初的颜色以及背景不同的像素全部填充为背景色。这样可以使得图片在变清晰的同时显得锐利。
核心代码
    for w in range(image.width):
        for h in range(image.height):
            r_, g_, b_ = image.getpixel((w, h))
            _r, _g, _b = text_color
            if (r_, g_, b_, 0) != (_r, _g, _b, 0):
                image.putpixel((w, h), bg_color)
concatenate_images()
将变形文字的图片和描述文字的图片拼接在一起。
--- 为了拓展性,我将其写成了可将一张或多张图片拼接成一张新图片。def concatenate_images(*images: Picture, strategy: str = "MAX", bg_color: Union[str, tuple] = (255, 255, 255)) -> Picture: """ :param bg_color: background color used as concatenated images; better be THE SAME as used in draw_text() and refine_drew_text_image() :param images: one or more image(s) to be concatenated :param strategy: MAX or MIN, if MAX, concatenated picture's WIDTH will be set to the LARGEST width of image in image tuple, vice versa; :return: concatenated picture """ images: tuple = images images_width = [image.width for image in images] images_height = [image.height for image in images] max_width, min_width = max(images_width), min(images_width) new_image_height = sum(images_height) + 50 new_image_width = max_width if strategy == "MAX" else min_width images = tuple(map(lambda img: img.resize(size=(new_image_width, floor(new_image_width * img.height / img.width))), images)) new_image = Image.new(mode="RGB", size=(new_image_width, new_image_height), color=bg_color) current_y = 0 for image in images: new_image.paste(image, (0, current_y)) current_y += image.height return new_image
文件下载
Comments 2 条评论
在本站发布后,于2022年7月14日 发布到52破解论坛
https://www.52pojie.cn/thread-1661045-1-1.html
从充电口处看建议闭一只眼