
前段时间拿到了一块正点原子的 i.mx6ull 板子,bilibili 一下后发现可以运行 linux。 那能不能加个摄像头做个监控哈基米的东西呢???似乎是可以的。
于是,就这么做了个愉快的决定,不是?
1. 续
有些许误解。开始查阅资料以及和克劳德、吉皮踢了解的相关内容的时候,当时理解只需要用 OpenCV 就可以了,但是从第一行代码到实际跑通一个“可用的” demo 时,才发现,对于这个任务,OpenCV 只是解决了运行的问题。其中包含的 Yolo才是核心。 细究一下,才发现要真正使 用 Yolo ,还需要对 yolo 模型根据自身要求进行训练微调(训练过程的代码给感觉 Yolo 似乎是基于 Pytorch 的)。
好家伙,又回到机器学习了是吧。Let's try how to train and deploy a yolo model!
2. 整体流程
在此,我预计按照下述流程进行阐述:
- 环境搭建:标注环境、训练环境准备;
- 训练数据的准备:这点包括:整理训练数据集、清洗数据、数据标注、数据格式转换(这个可以忽略,一般标注工具在导出时会自动提供转换格式的功能);
- 数据集划分:划分 Training / Validation 数据集,由于数据量较多,Test集合我们就忽略了,这步我在后续内容中会提供相关脚本;
- 模型微调训练:这里我们选择 yolo11s.pt 作为基础模型;根据对一些关键参数的监控,可能需要重复多次进行调整;
- 模型验证:这里,通过查看相关关键参数,如loss、 Confusion Matrix等;
- 实际推理和测试:用真实的图片进行测试,查看实际识别结果;
- 部署:部署到实际设备。
3. 环境搭建
在实际操作过程,发现数据标注软件 label-studio 和 yolo 有部分依赖重叠,但要求版本不同。因此,建议分别为他们建立一个独立的环境。环境管理因为之前已经安装了 anaconda ,就使用它不做变更。 如果觉得 anaconda 太臃肿,可以使用 miniconda 或者 uv ; 当然,如果你已经安装了 3.11 或以上版本的 python ,用自带的 pyenv 也可以。但这里,我们以 anaconda 为标准。
如果你使用的是 macOS 或 linux:
首先,我们打开 terminal,在 documents 文件夹下创建项目目录 yolo_finetune:
cd documents

mkdir yolo_finetune

cd yolo_finetune
如果你使用的是 windows,:
则可以打开 cmd , 在常用的位置,比如 D:\ 创建我们的项目目录 yolo_finetune:
D:

mkdir yolo_finetune

cd yolo_finetune
一切就绪,我们已经身处 yolo_finetune 中, 可以进行后续步骤。
3.1 label-studio 环境
为 label-studio 创建独立的环境,避免依赖冲突导致训练或标注任务出现问题(虽然尝试了只用一个环境似乎也没什么事,但为了可复现性,还是分开为好)。在此,可通过后续命令创建:
conda create -p ./labelenv python=3.11
上述命令会在当前目录(yolo_finetune)中创建环境 labelenv ,python 版本为 3.11 。然后我们通过下方命令激活它。
conda activate ./labelenv
接着我们安装 label-studio:
pip install label-studio
cd ~/documents/yolo_finetune

conda activate ./labelenv

label-studio
D:

cd yolo_finetune

conda activate ./labelenv

label-studio
3.2 YOLO 环境
conda create -p ./yoloenv python=3.11

conda activate ./yoloenv
上述命令会在当前目录(yolo_finetune)中创建环境 yoloenv ,python 版本为 3.11 。然后我们激活它。
YOLO 依赖中包含 Pytorch。而Pytorch的安装方式也依赖你的硬件。然,在此之前,请先检查你当前使用的电脑的硬件:
3.2.1 WIN:
如果你是 windows, 请先安装 nvida 显卡驱动以及 CUDA。CUDA 版本最好不小于 11.8, 不高于 13.0 (2026-01-03 写稿时的最高支持版本)。如果你电脑没有显卡、或者是amd显卡 (pytorch是有相关api的,但没用过amd的卡,不知道具体怎么用)、又或是 macOS系统,请跳过。
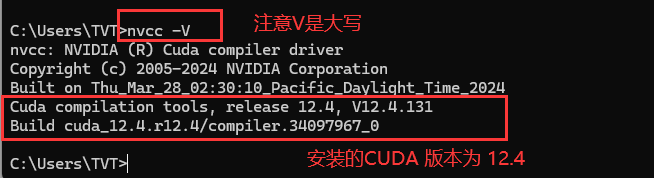
安装并重启完成后,打开cmd,指定下方指令,它应该显示已安装的 cuda 版本,下文假设你安装的是 12.8 版本的 CUDA:
nvcc -V
它的输出应该类似于下图,如果一致,可以走后续步骤,否则请重新安装驱动和 CUDA。
3.2.2 MAC:
无需做任何事
3.2.3 WIN安装Pytorch:
- 操作前请在 激活 yoloenv 的 terminal 或 cmd 窗口中进行。
- 如果你是 windows 系统,还记得你装的 CUDA 版本吗?
我们前往 Pytorh的官网:pytorch.org 。如果你是windows 可根据你的驱动的安装情况选择复制下方的安装命令:
|
|
|
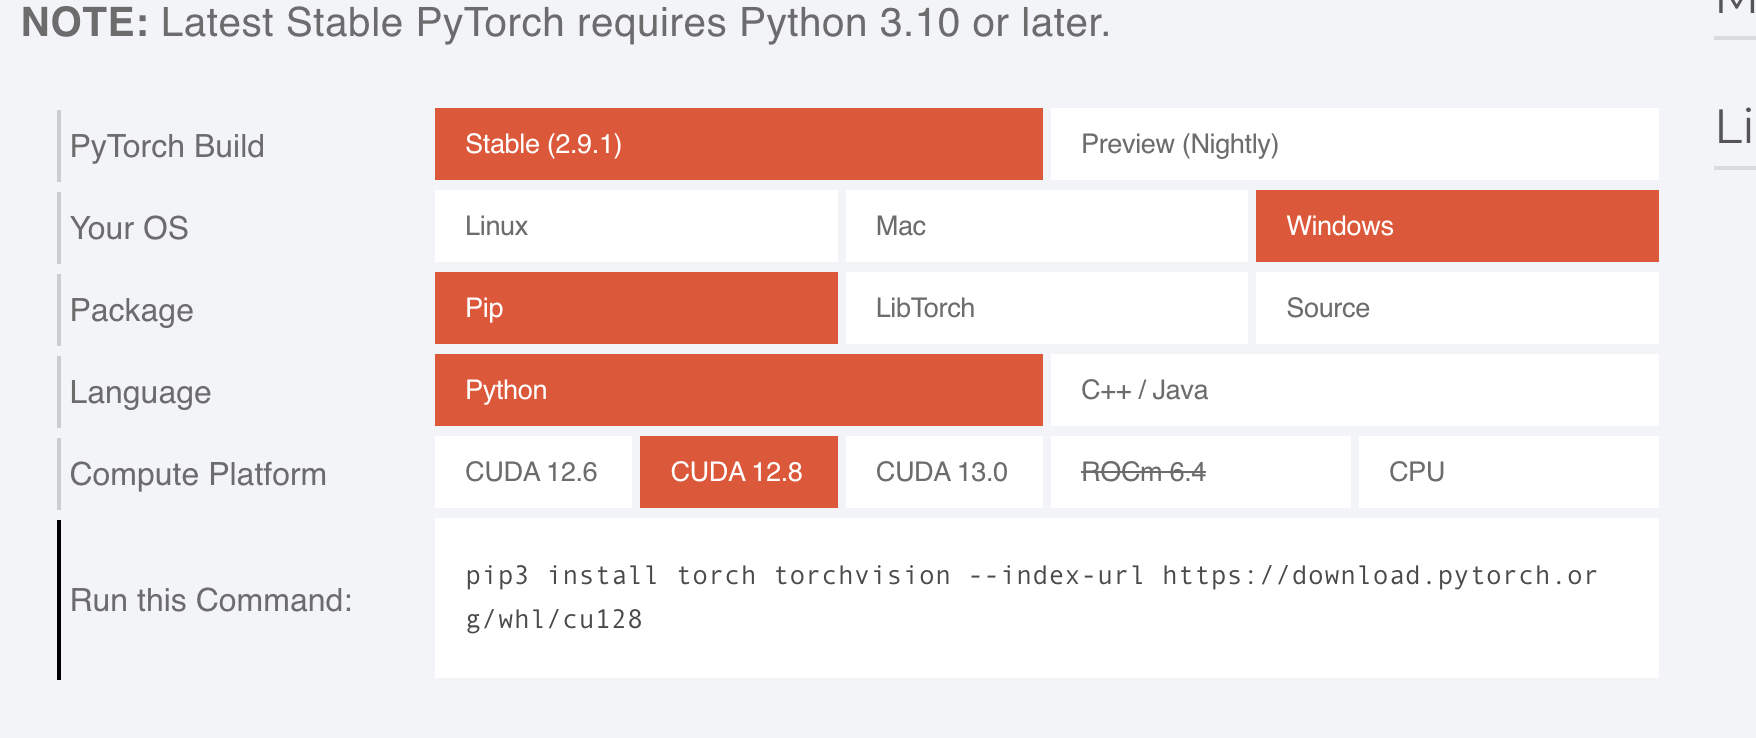
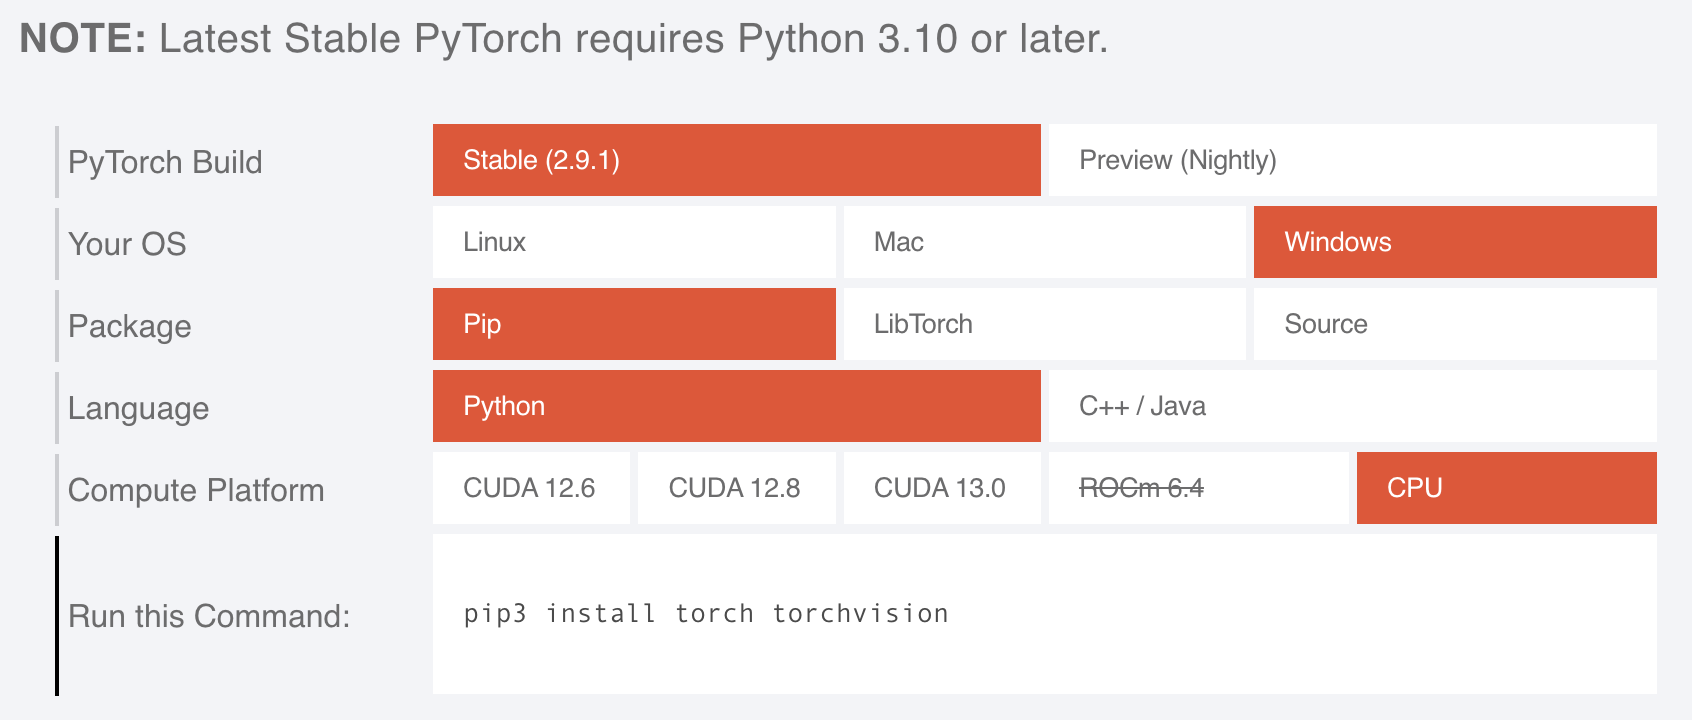
cuda:
pip3 install torch torchvision --index-url https://download.pytorch.org/whl/cu128
cpu:
pip3 install torch torchvision --index-url https://download.pytorch.org/whl/cpu
安装完成后我们可以验证是否安装成功。在同一个 cmd 窗口中输入:
python

import torch
torch.cuda.is_available()
如果输出是 True, 则说明你的 Cuda 和 Pytorch 都安装正常; 如果是 False, 请重新安装 或 直接使用 cpu 版本(但会非常慢)。
3.2.4 MAC安装Pytorch:
操作前请在 激活 yoloenv 的 terminal 窗口中进行。
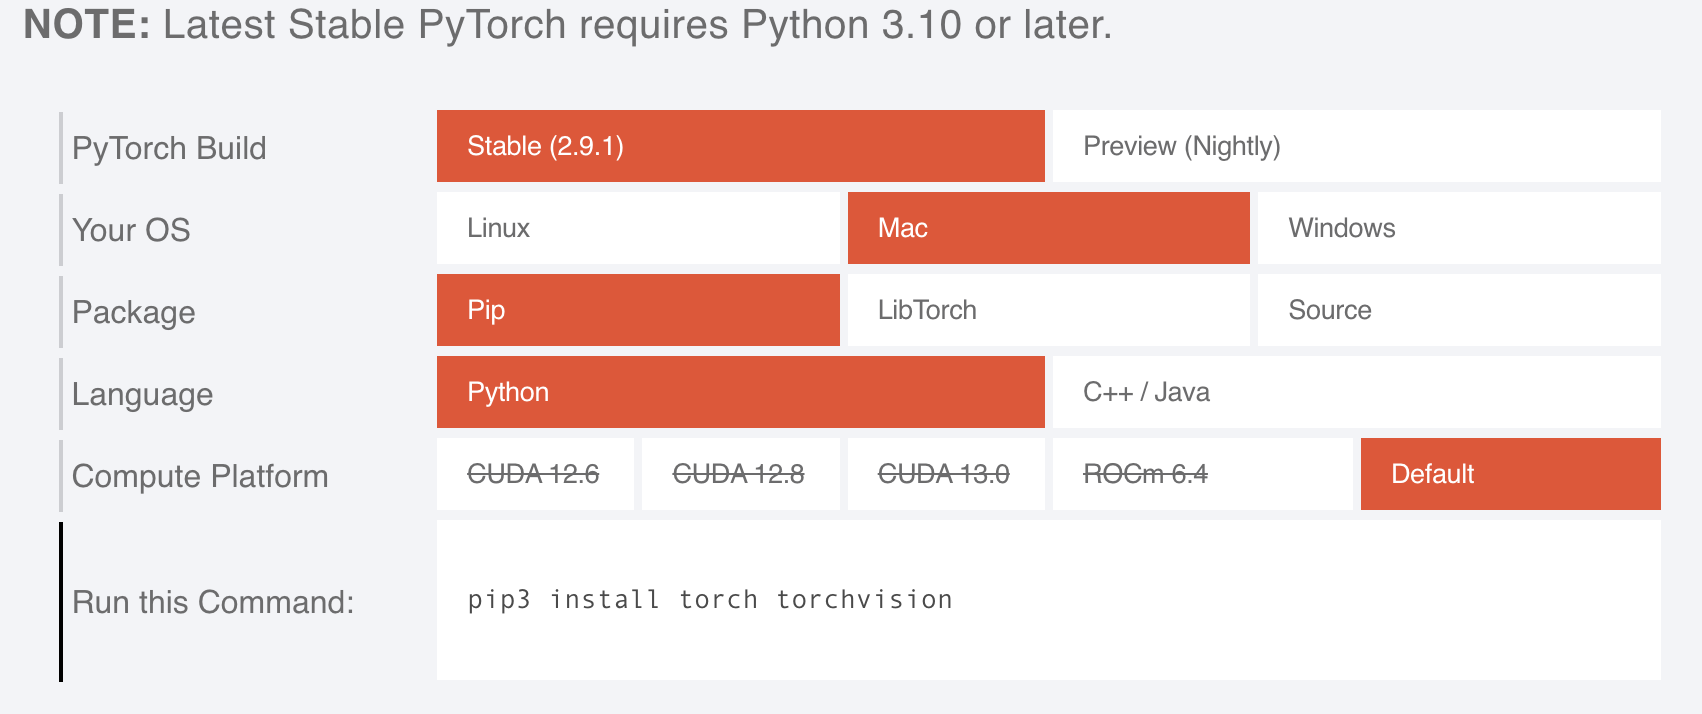
如果是 mac ,直接使用下方命令安装即可:
pip3 install torch torchvision
验证是否安装成功。在同一个 terminal 窗口中输入:
python

import torch
torch.mps.is_available()
如果输出是 True, 则说明 Pytorch 安装正常; 如果是 False, 可尝试按这个【Apple官方教程】重新安装 或 后续直接使用 cpu 版本训练和推理。
pytorch安装完成后,我们安装yolo 以及 onnx (后续导出onnx给OpenCV使用时候要用):
pip install -U ultralytics
pip3 install onnx onnxslim onnxruntime
准备基础模型yolo11s.pt,然后用准备好的图片在其基础上进行微调。该命令将下载 yolo11s.pt 到 yolo_finetune 文件夹内:
yolo export model=yolo11s.pt format=pt
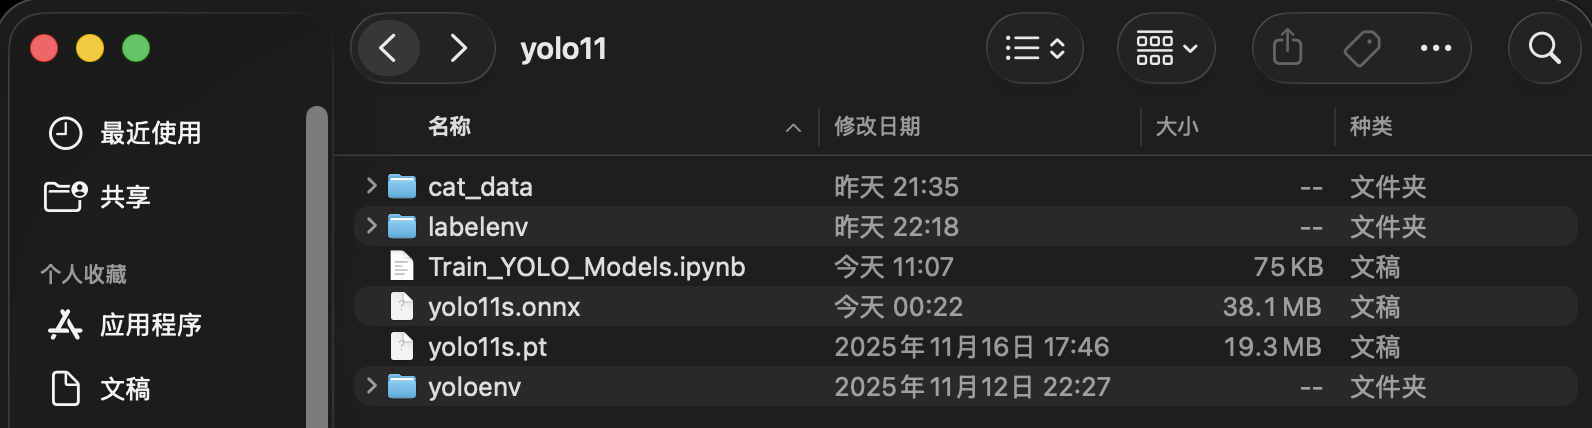
完事具备,此时,我们已经完成了 labelenv 和 yoloenv 环境搭建的工作,可以着手后续数据集相关的工作。当前,我们的 yolo_finetune 文件夹内的结构应该类似于
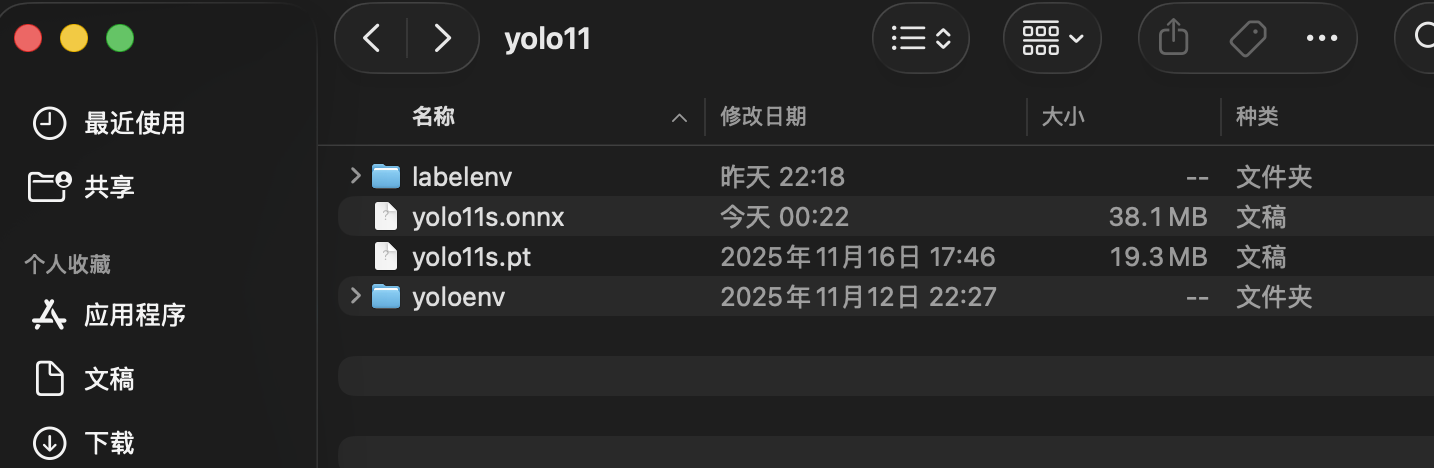
yolo11s.onnx 可以忽略,差异原因是我在导出 yolo11s.pt 的时候使用的命令 yolo export model=yolo11s.pt format=onnx 。
4. 训练数据的准备
4.1 下载数据集:
猫分类数据集.zip
链接:https://pan.quark.cn/s/2ada05b5d874
提取码:1xNa
原数据已经进行了基本的清洗,剔除了过于模糊、马赛克、尺寸不合格的图片,并且已经按照 测试 : 训练 = 1 : 9 划分了数据。
4.2 基础数据清洗
其中对于模糊(高斯模糊)的判断是将图片转灰度图后计算 Laplacian Operator(二阶导)及其方差;对于模糊(马赛克模糊),则是对灰度图求sobel方向集中度
cv::mat img, gray, lap;
img = cv::imread("path to image");


cv::cvtColor(img, gray, cv::COLOR_BGR2GRAY);
cv::Laplacian(gray, lap, CV_64F);

cv::Scalar mean, sigma;
cv::meanStdDev(lap, mu, sigma);
double variance = sigma.val[0] * sigma.val[0];
double threshold = 100.0;
/*
然后通过  variance 与 threshold 比较,小于threshold 说明模糊
*/
bool isMosaicByGradient(const cv::Mat& img)
{
    cv::Mat gray;
    cv::cvtColor(img, gray, cv::COLOR_BGR2GRAY);

    cv::Mat gx, gy;
    cv::Sobel(gray, gx, CV_32F, 1, 0, 3);
    cv::Sobel(gray, gy, CV_32F, 0, 1, 3);

    cv::Mat mag, angle;
    cv::cartToPolar(gx, gy, mag, angle, true); // angle: 0~360°

    int hvCount = 0;
    int total = 0;

    for (int y = 0; y < angle.rows; y++)
    {
        for (int x = 0; x < angle.cols; x++)
        {
            float m = mag.at<float>(y, x);
            if (m < 20) continue;  // 忽略弱边缘

            float a = angle.at<float>(y, x);
            total++;

            // 接近 0°, 90°, 180°, 270°
            if (a < 10 || (a > 80 && a < 100) ||
                (a > 170 && a < 190) ||
                (a > 260 && a < 280))
            {
                hvCount++;
            }
        }
    }

    if (total == 0) return false;

    double ratio = (double)hvCount / total;
    return ratio > 0.75; // 马赛克通常 > 0.8
}
5. 数据标注
5.1 集合数据
解压 猫分类数据集.zip 后,将且仅将图片放到 cat_data 文件夹中并经过清洗后,你的项目目录结构应该类似于下图:
5.2 LabelStudio创建yolo项目
激活 labelenv 后输入命令 label-studio 后会自动在浏览器中(地址:http://localhost:8080/ )打开 Label Studio 。打开后需要注册(数据是存在本地的,无需联网,账户仅用于区分权限),随便输入邮箱和密码就好。进入 Label Studio
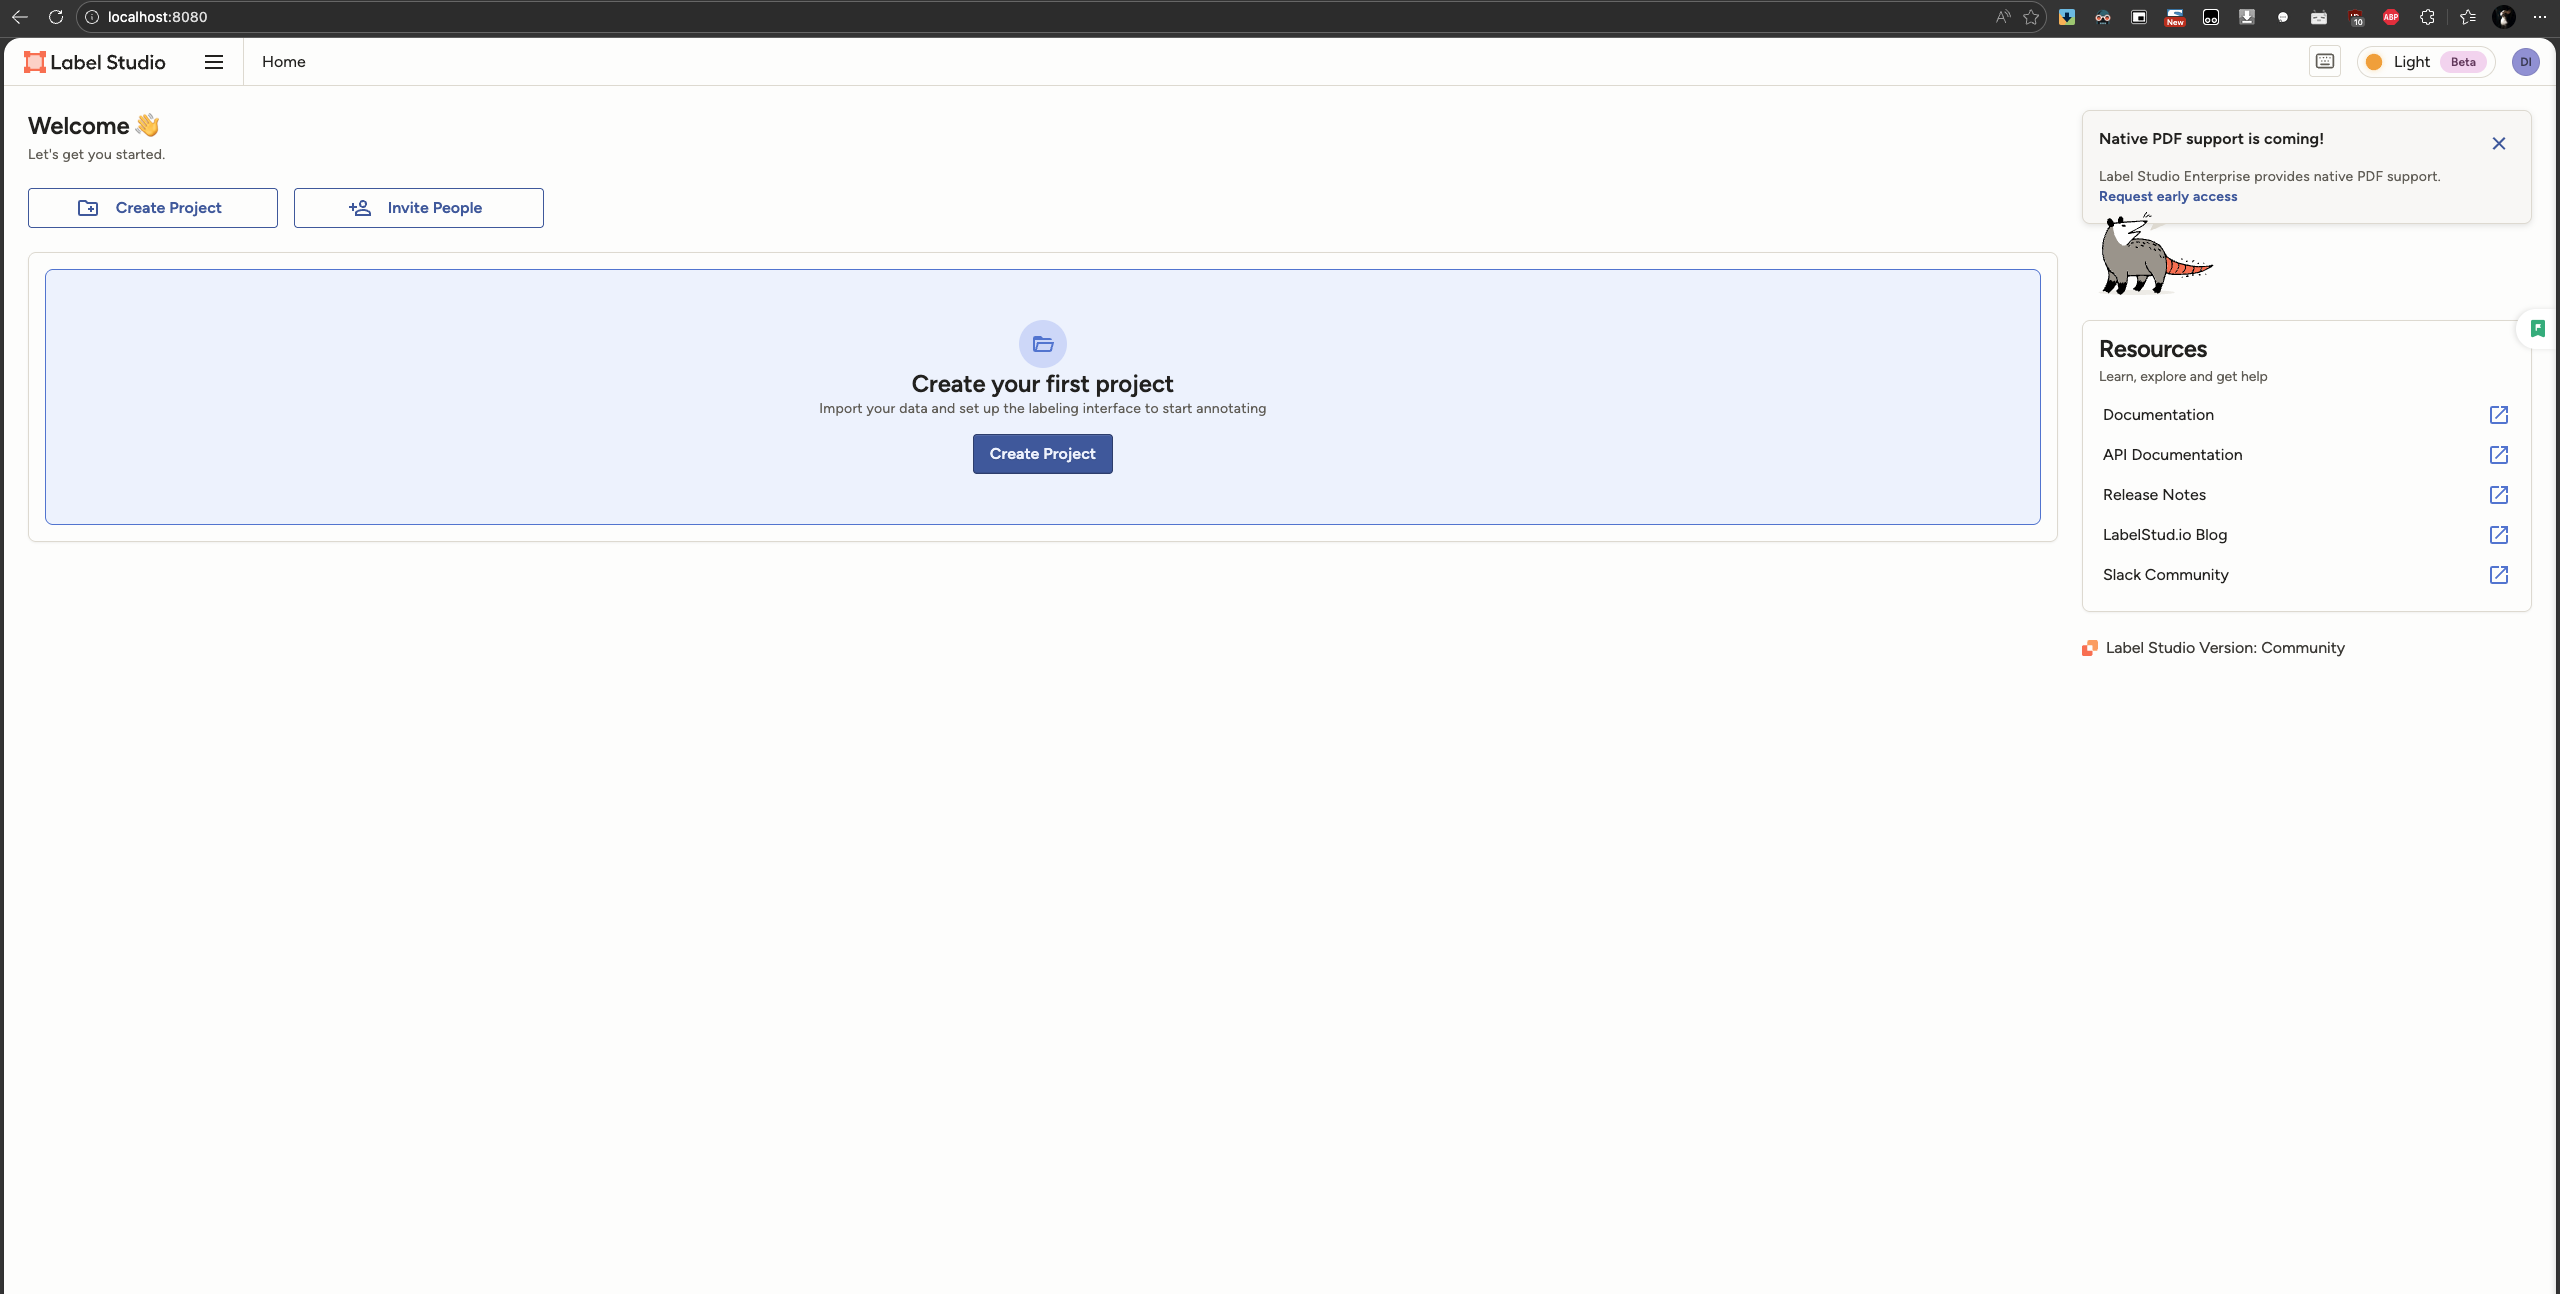
5.2.1 创建项目
在主界面上点击 Create Project 创建标注项目 CatLabel:
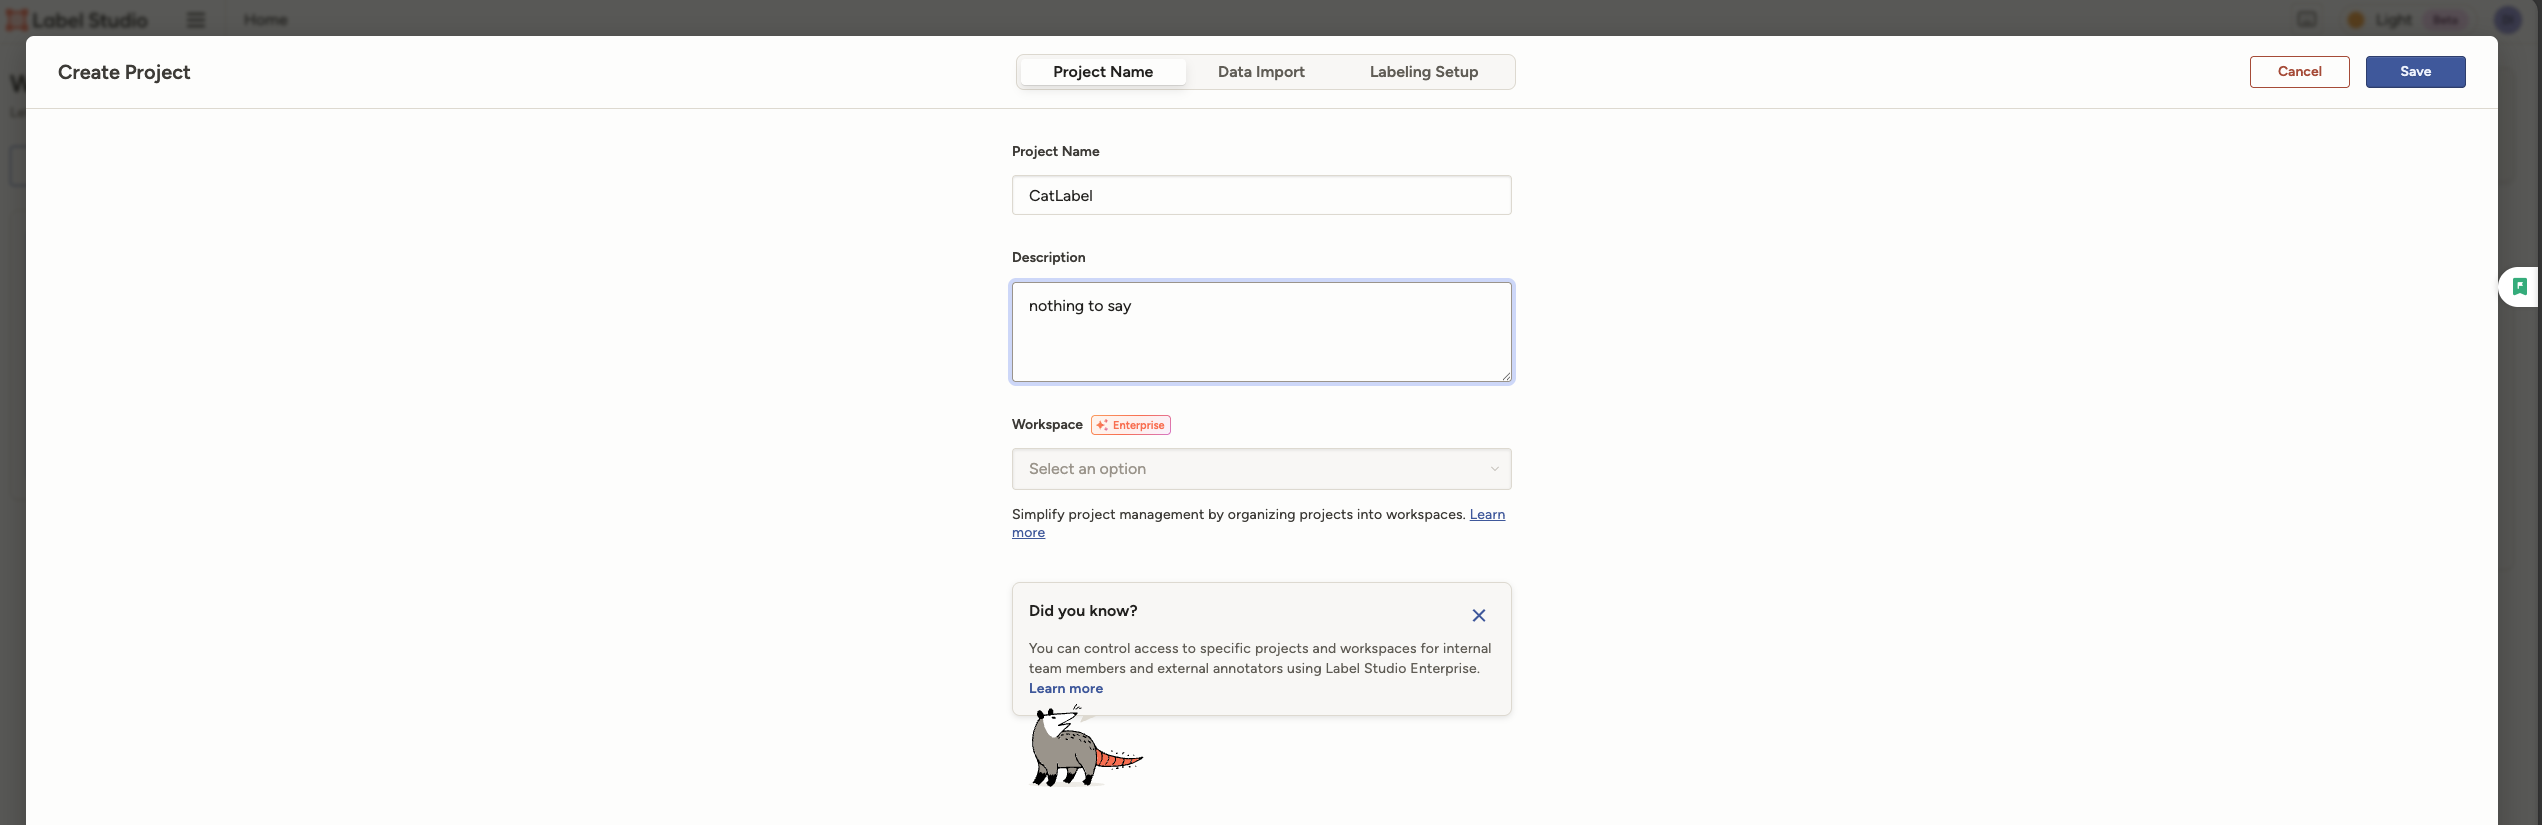 在Project Name中填写CatLabel
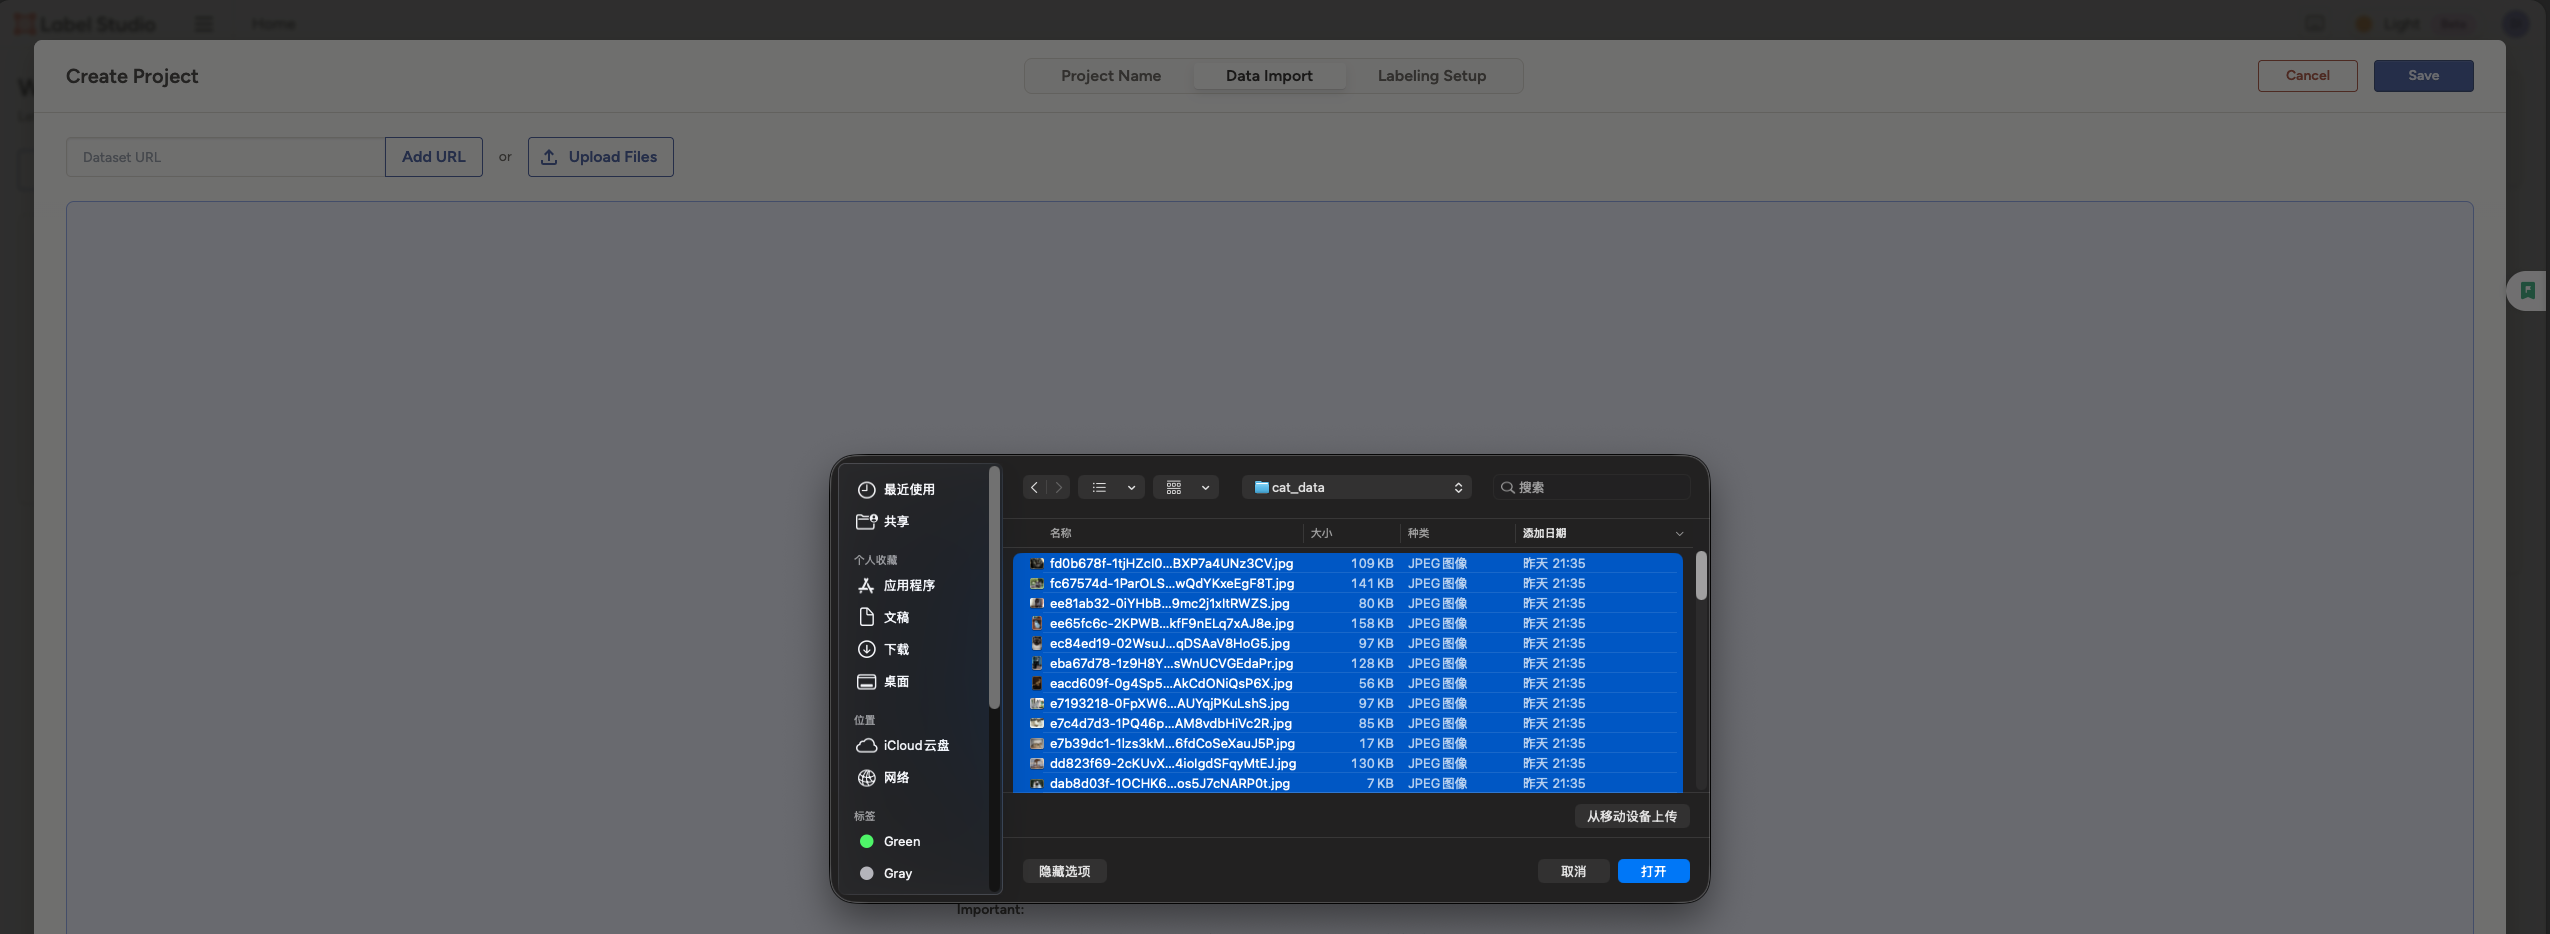 在Data Import 中导入 cat_data 中已经准备好的图片数据
 Labeling Setup中选择 Object Detection with Bounding Boxes
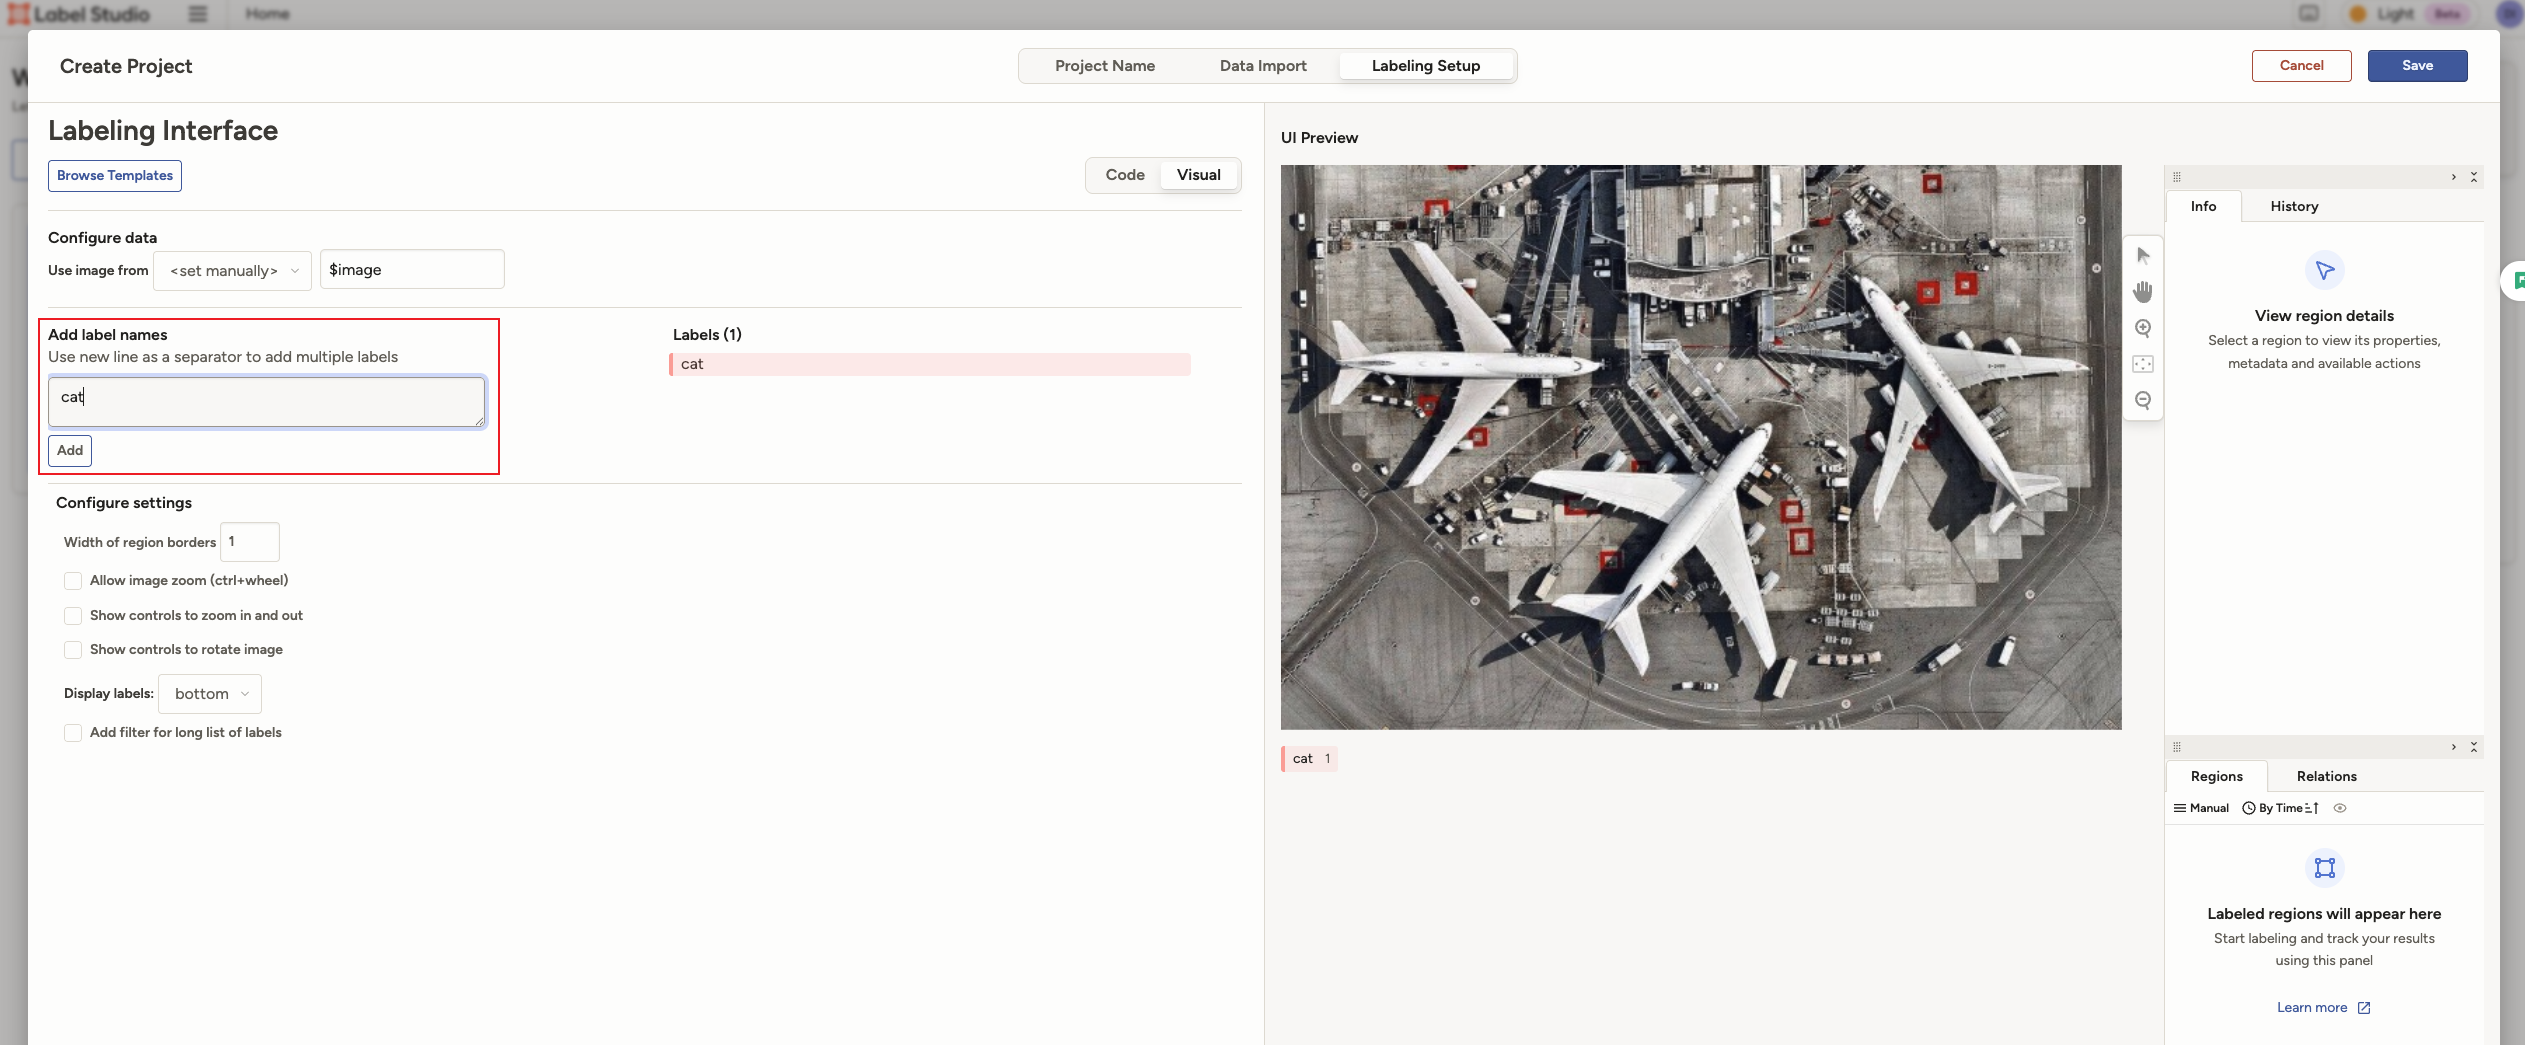 添加标签 Cat,并删除多余标签
5.2.2 标注并导出
这是最无趣但很重要的部分,标注要包括猫的整体,但不也不能包括太多不是猫的部分。
 按图中数字顺序进行操作
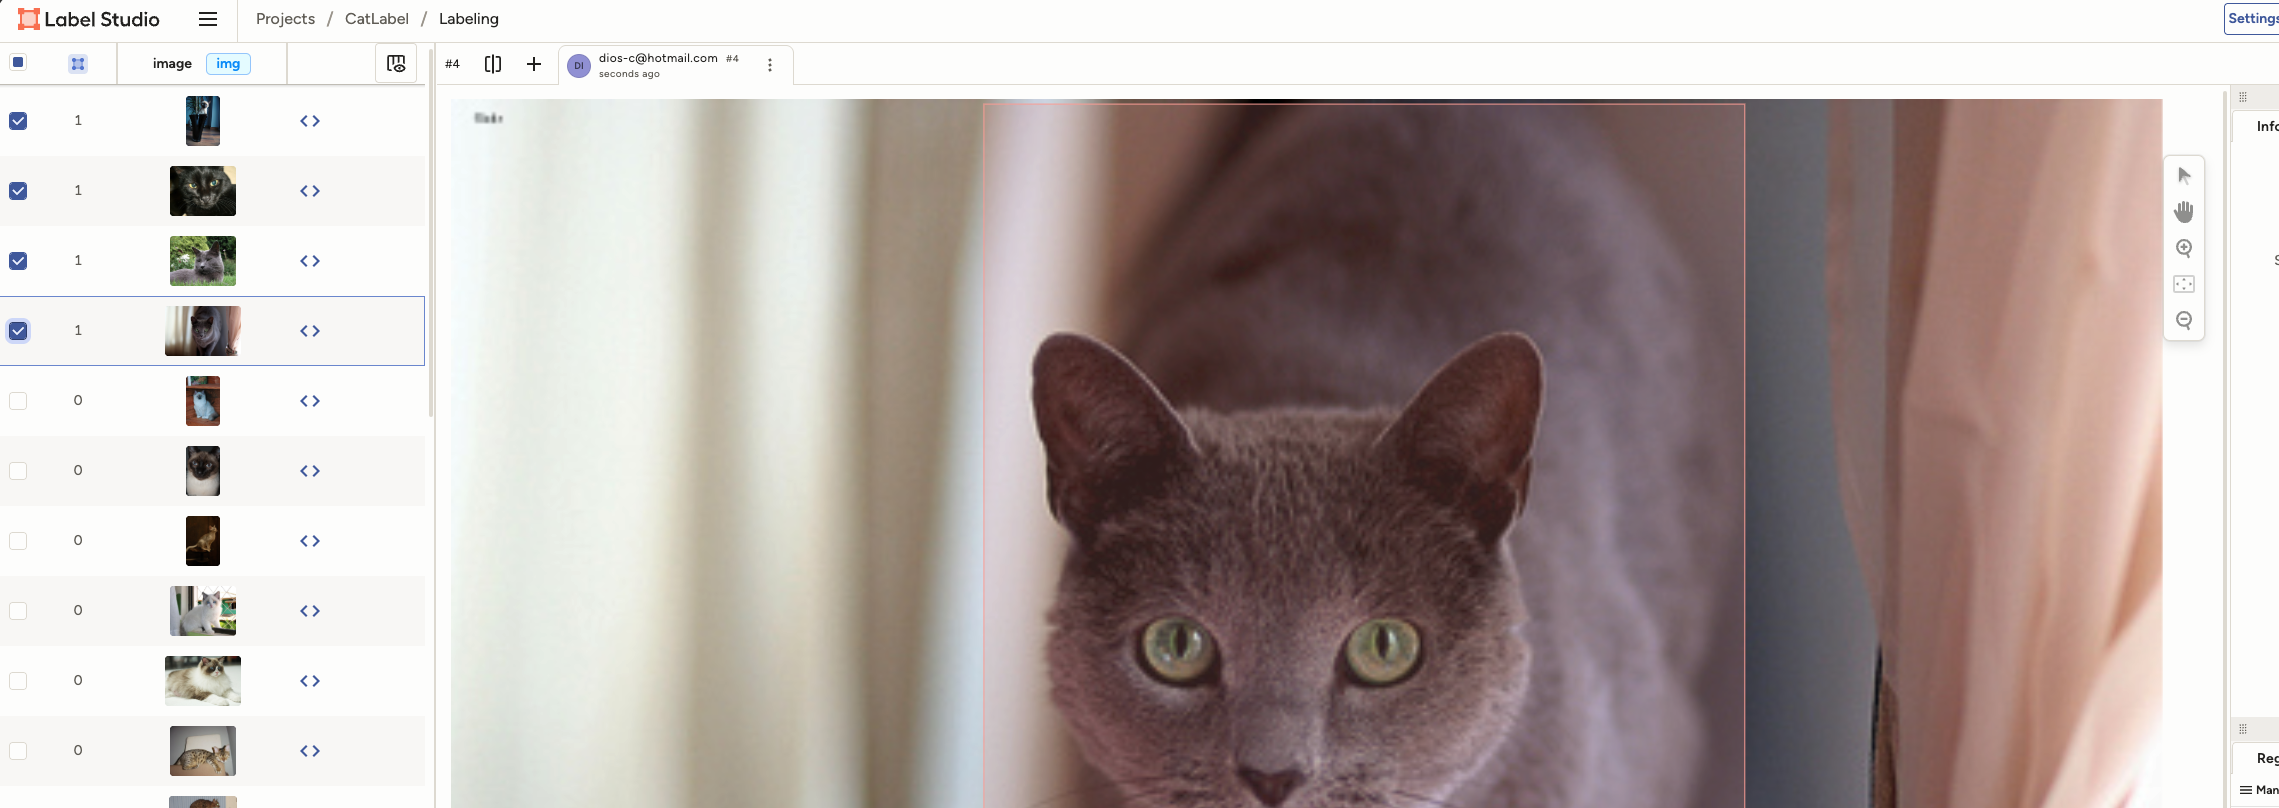 一张图片标注操作完成后将左侧的图片勾选上,表示此图已经标注完成
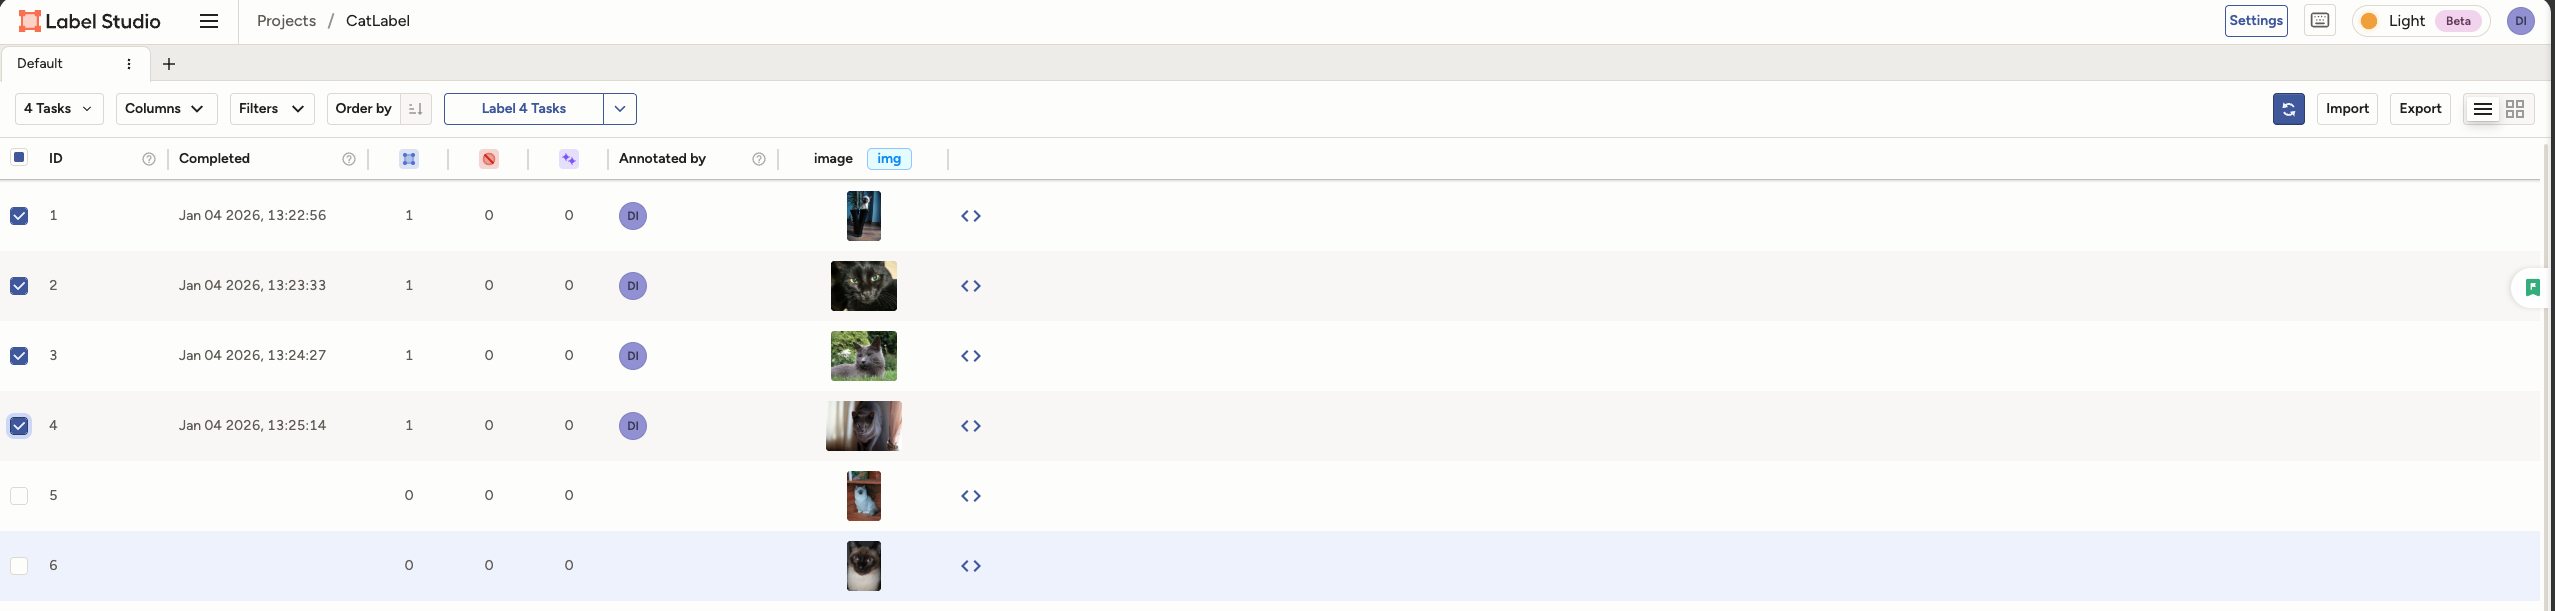
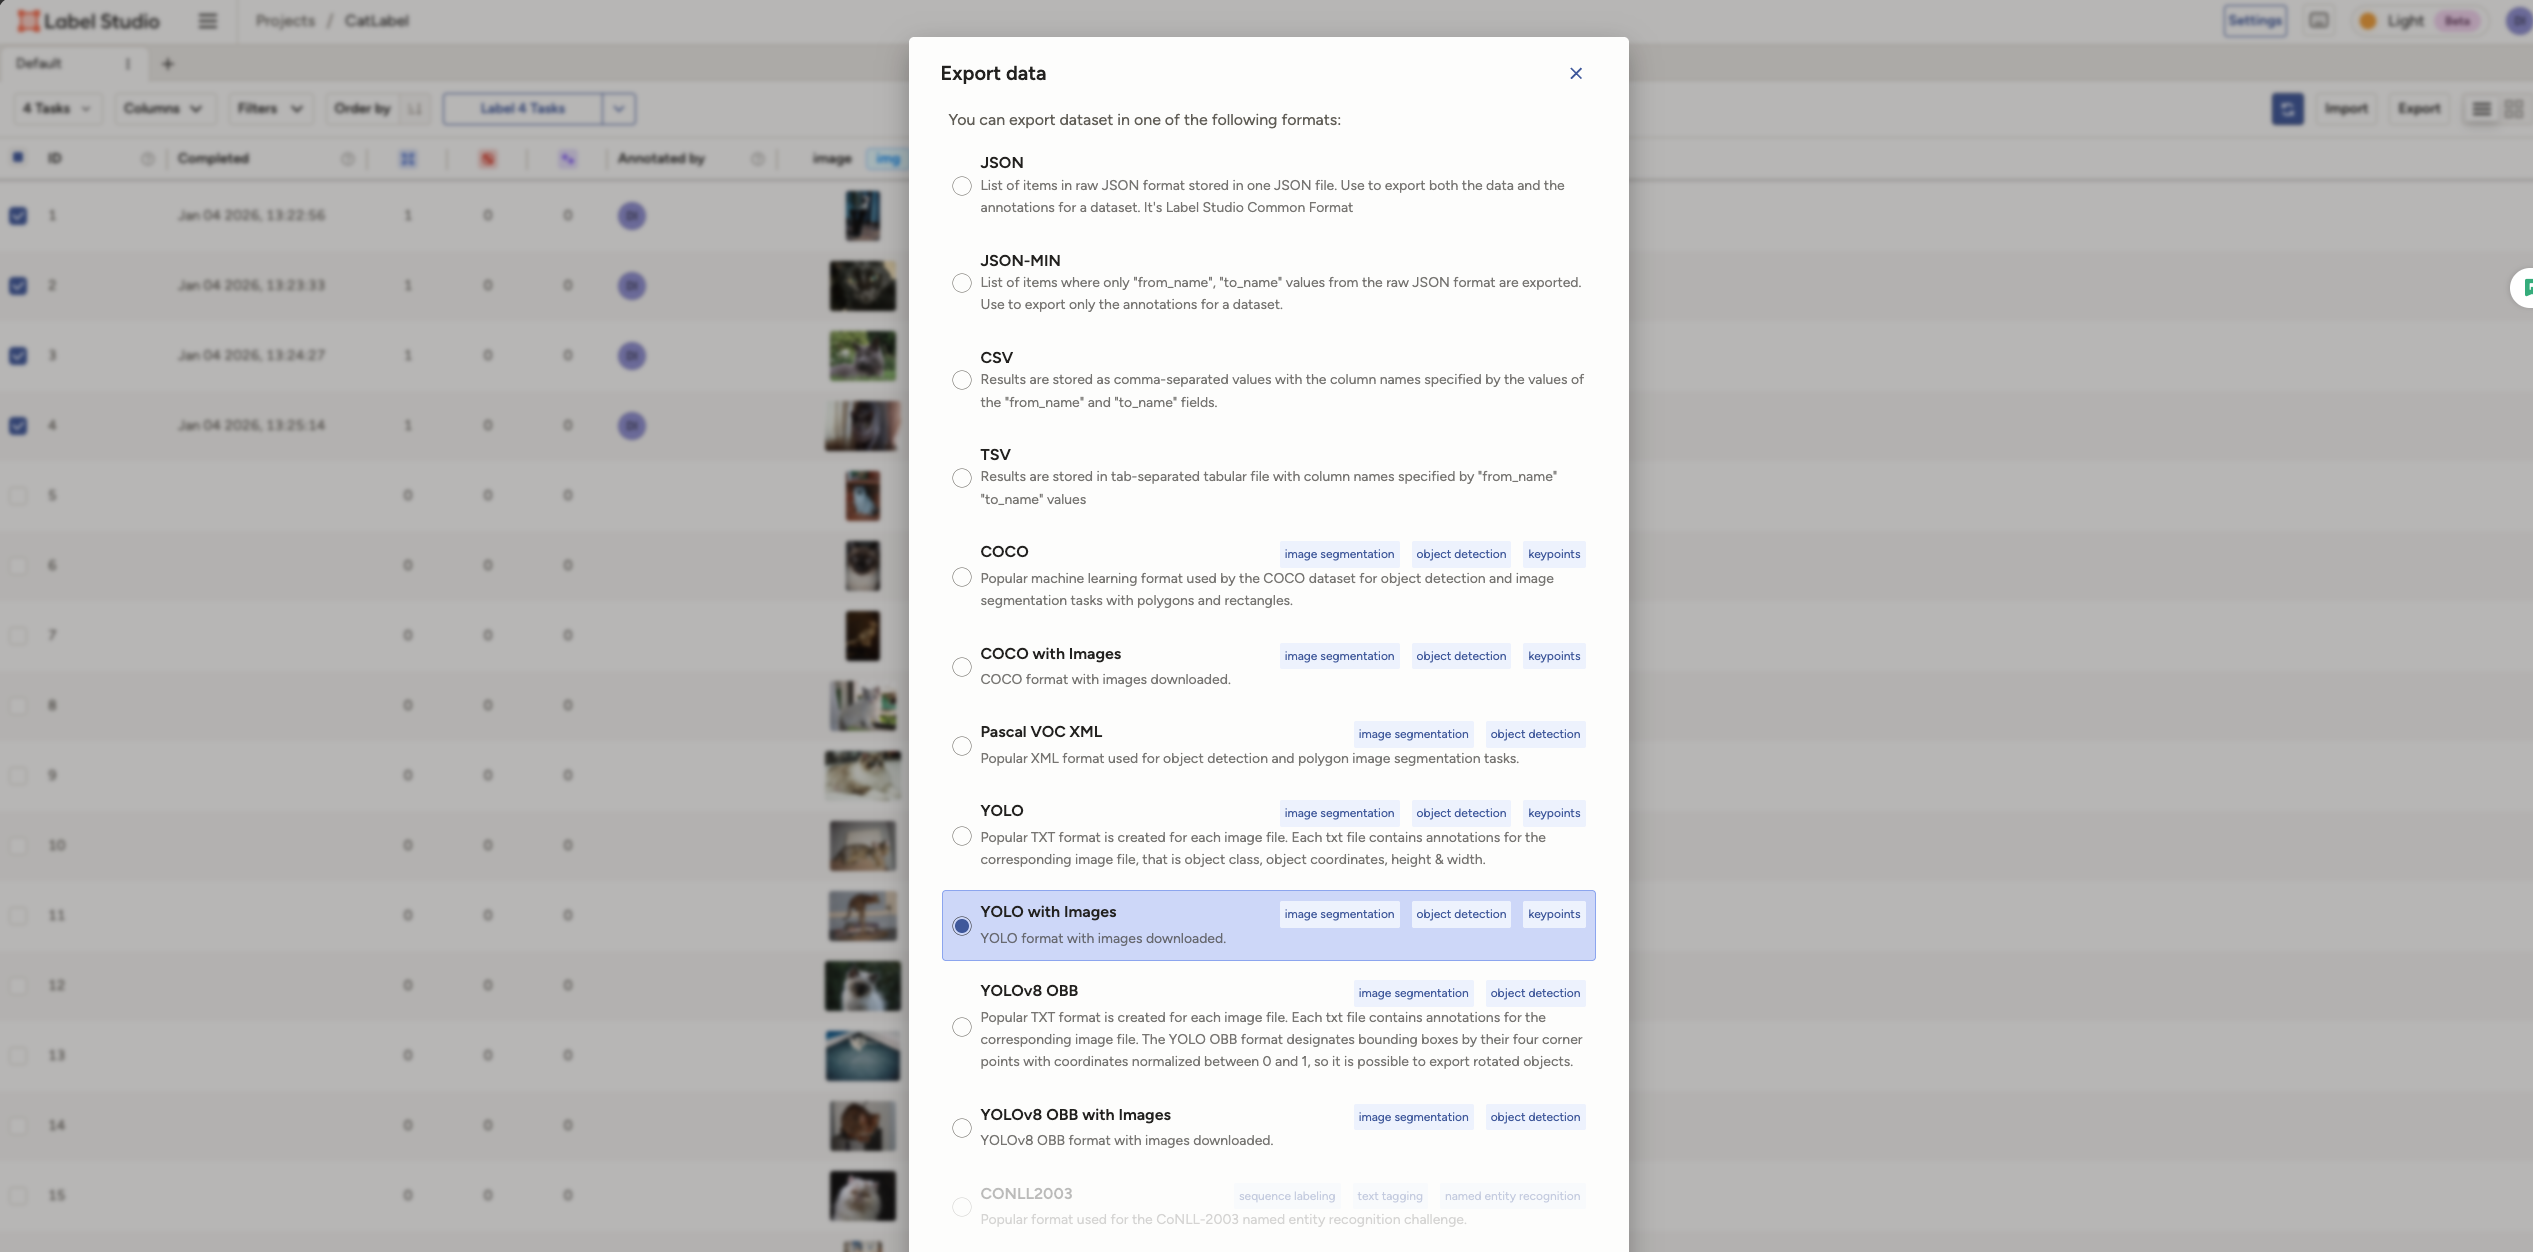
将导入的图片全部标注完成后,我们回到列表,将所有已标注的图片选中并导出。注意,选择导出格式的时候需要选择yolo with images
导出后的是一个压缩包,它的名字类似于 :project-2-at-2026-01-04-05-26-5e265015.zip 。我们将压缩包的内容中的内容导出到项目根目录 yolo_finetune中的 labeled_data中。此时,labeled_data 的结构应该如下图所示:

6. 数据集划分
数据集合并且标注后,将 label studio导出的文件夹 labeled_data 后 train_val_split.py 来重新划分。
注意激活 labelenv 后执行下方命令,执行完毕后,yolo_finetune 文件夹内会多一个data文件夹,其中 labeled_data 是已经标注好的 yolo 数据集合,如下图所示:
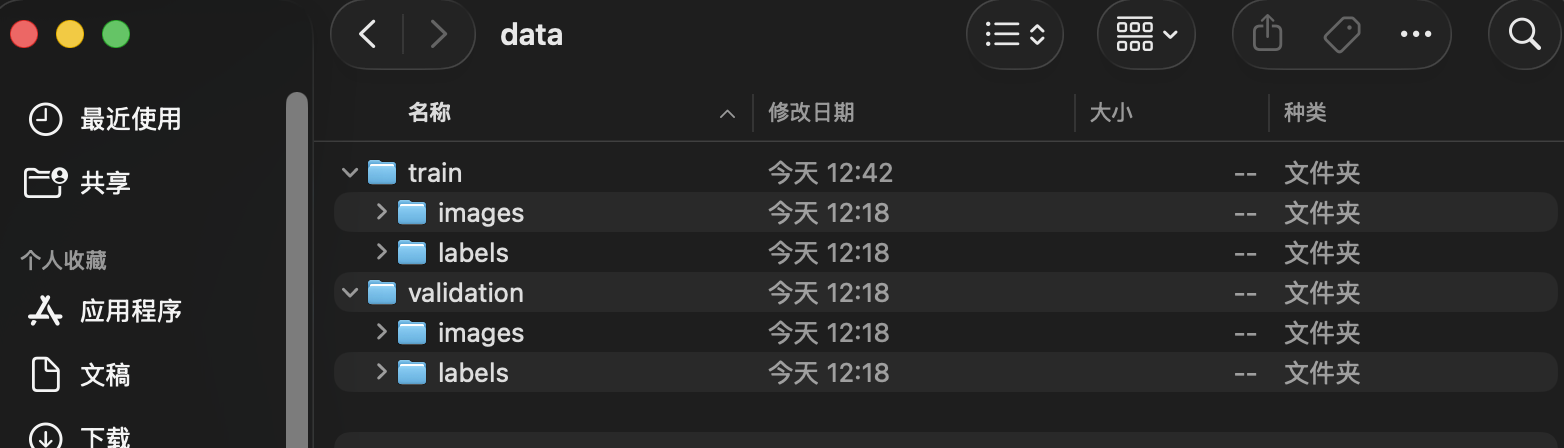
python train_val_split.py --datapath="./labeled_data" --train_pct=0.9
7. 模型微调训练

模型微调训练的具体过程可【展开】下方 Jupyter Notebook 来查看。当然,你也可以【下载】后本地运行。
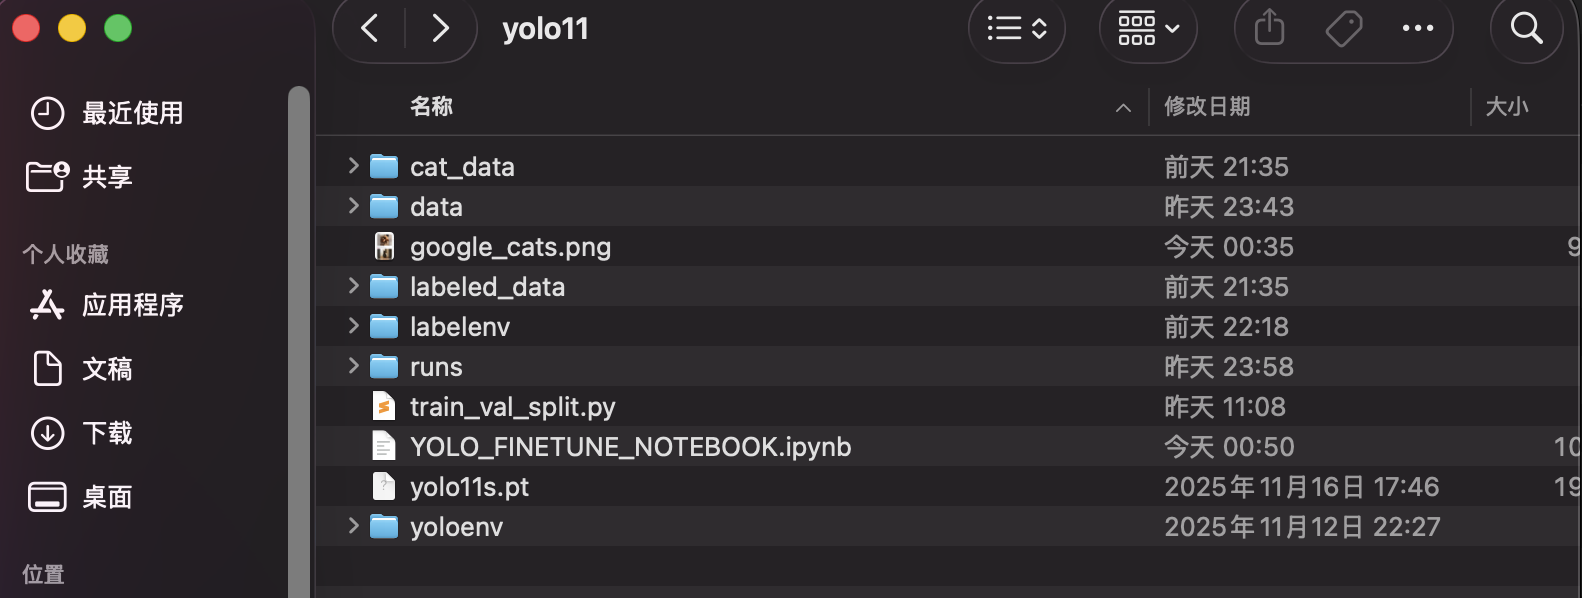
训练完成后,项目文件夹 yolo_fintune 的结构应该如下:
注意训练命令:
!yolo detect train data="./data/data.yaml" model="./yolo11s.pt" epochs=60 imgsz=640 device={device}
如果希望后续手动在 cmd/terminal 中执行,而不使用 jupyer notebook。 你可以根据自身设备的情况调整 device , 比如:使用 Nvidia 的显卡则修改为 cuda , 使用 mac/macbook 则修改为mps。
笔记中的 create_data_yaml() 函数比较重要,其定义以及用法如下。执行完成后,会在 ./data 文件夹中生成训练所需的 data.yaml 。建议详细阅读 jupyter notebook 中的此部分内容。因为脚本与本项目文件夹的结构以及之前步骤的所有操作强相关,如果不能理解,请详细阅读本文之前的步骤。
import yaml
import os

def create_data_yaml(path_to_classes_txt, path_to_data_yaml, path_to_data_folder):

  # Read class.txt to get class names
  if not os.path.exists(path_to_classes_txt):
    print(f'classes.txt file not found! Please create a classes.txt labelmap and move it to {path_to_classes_txt}')
    return
  with open(path_to_classes_txt, 'r') as f:
    classes = []
    for line in f.readlines():
      if len(line.strip()) == 0: continue
      classes.append(line.strip())
  number_of_classes = len(classes)

  # Create data dictionary
  data = {
      'path': f'{path_to_data_folder}',
      'train': 'train/images',
      'val': 'validation/images',
      'nc': number_of_classes,
      'names': classes
  }

  # Write data to YAML file
  with open(path_to_data_yaml, 'w') as f:
    yaml.dump(data, f, sort_keys=False)
  print(f'Created config file at {path_to_data_yaml}')

  return

# Define path to classes.txt and run function
path_to_data_folder =  './data'
path_to_classes_txt = './labeled_data/classes.txt'
path_to_data_yaml = './data/data.yaml'

create_data_yaml(path_to_classes_txt, path_to_data_yaml, path_to_data_folder)
8. 模型验证
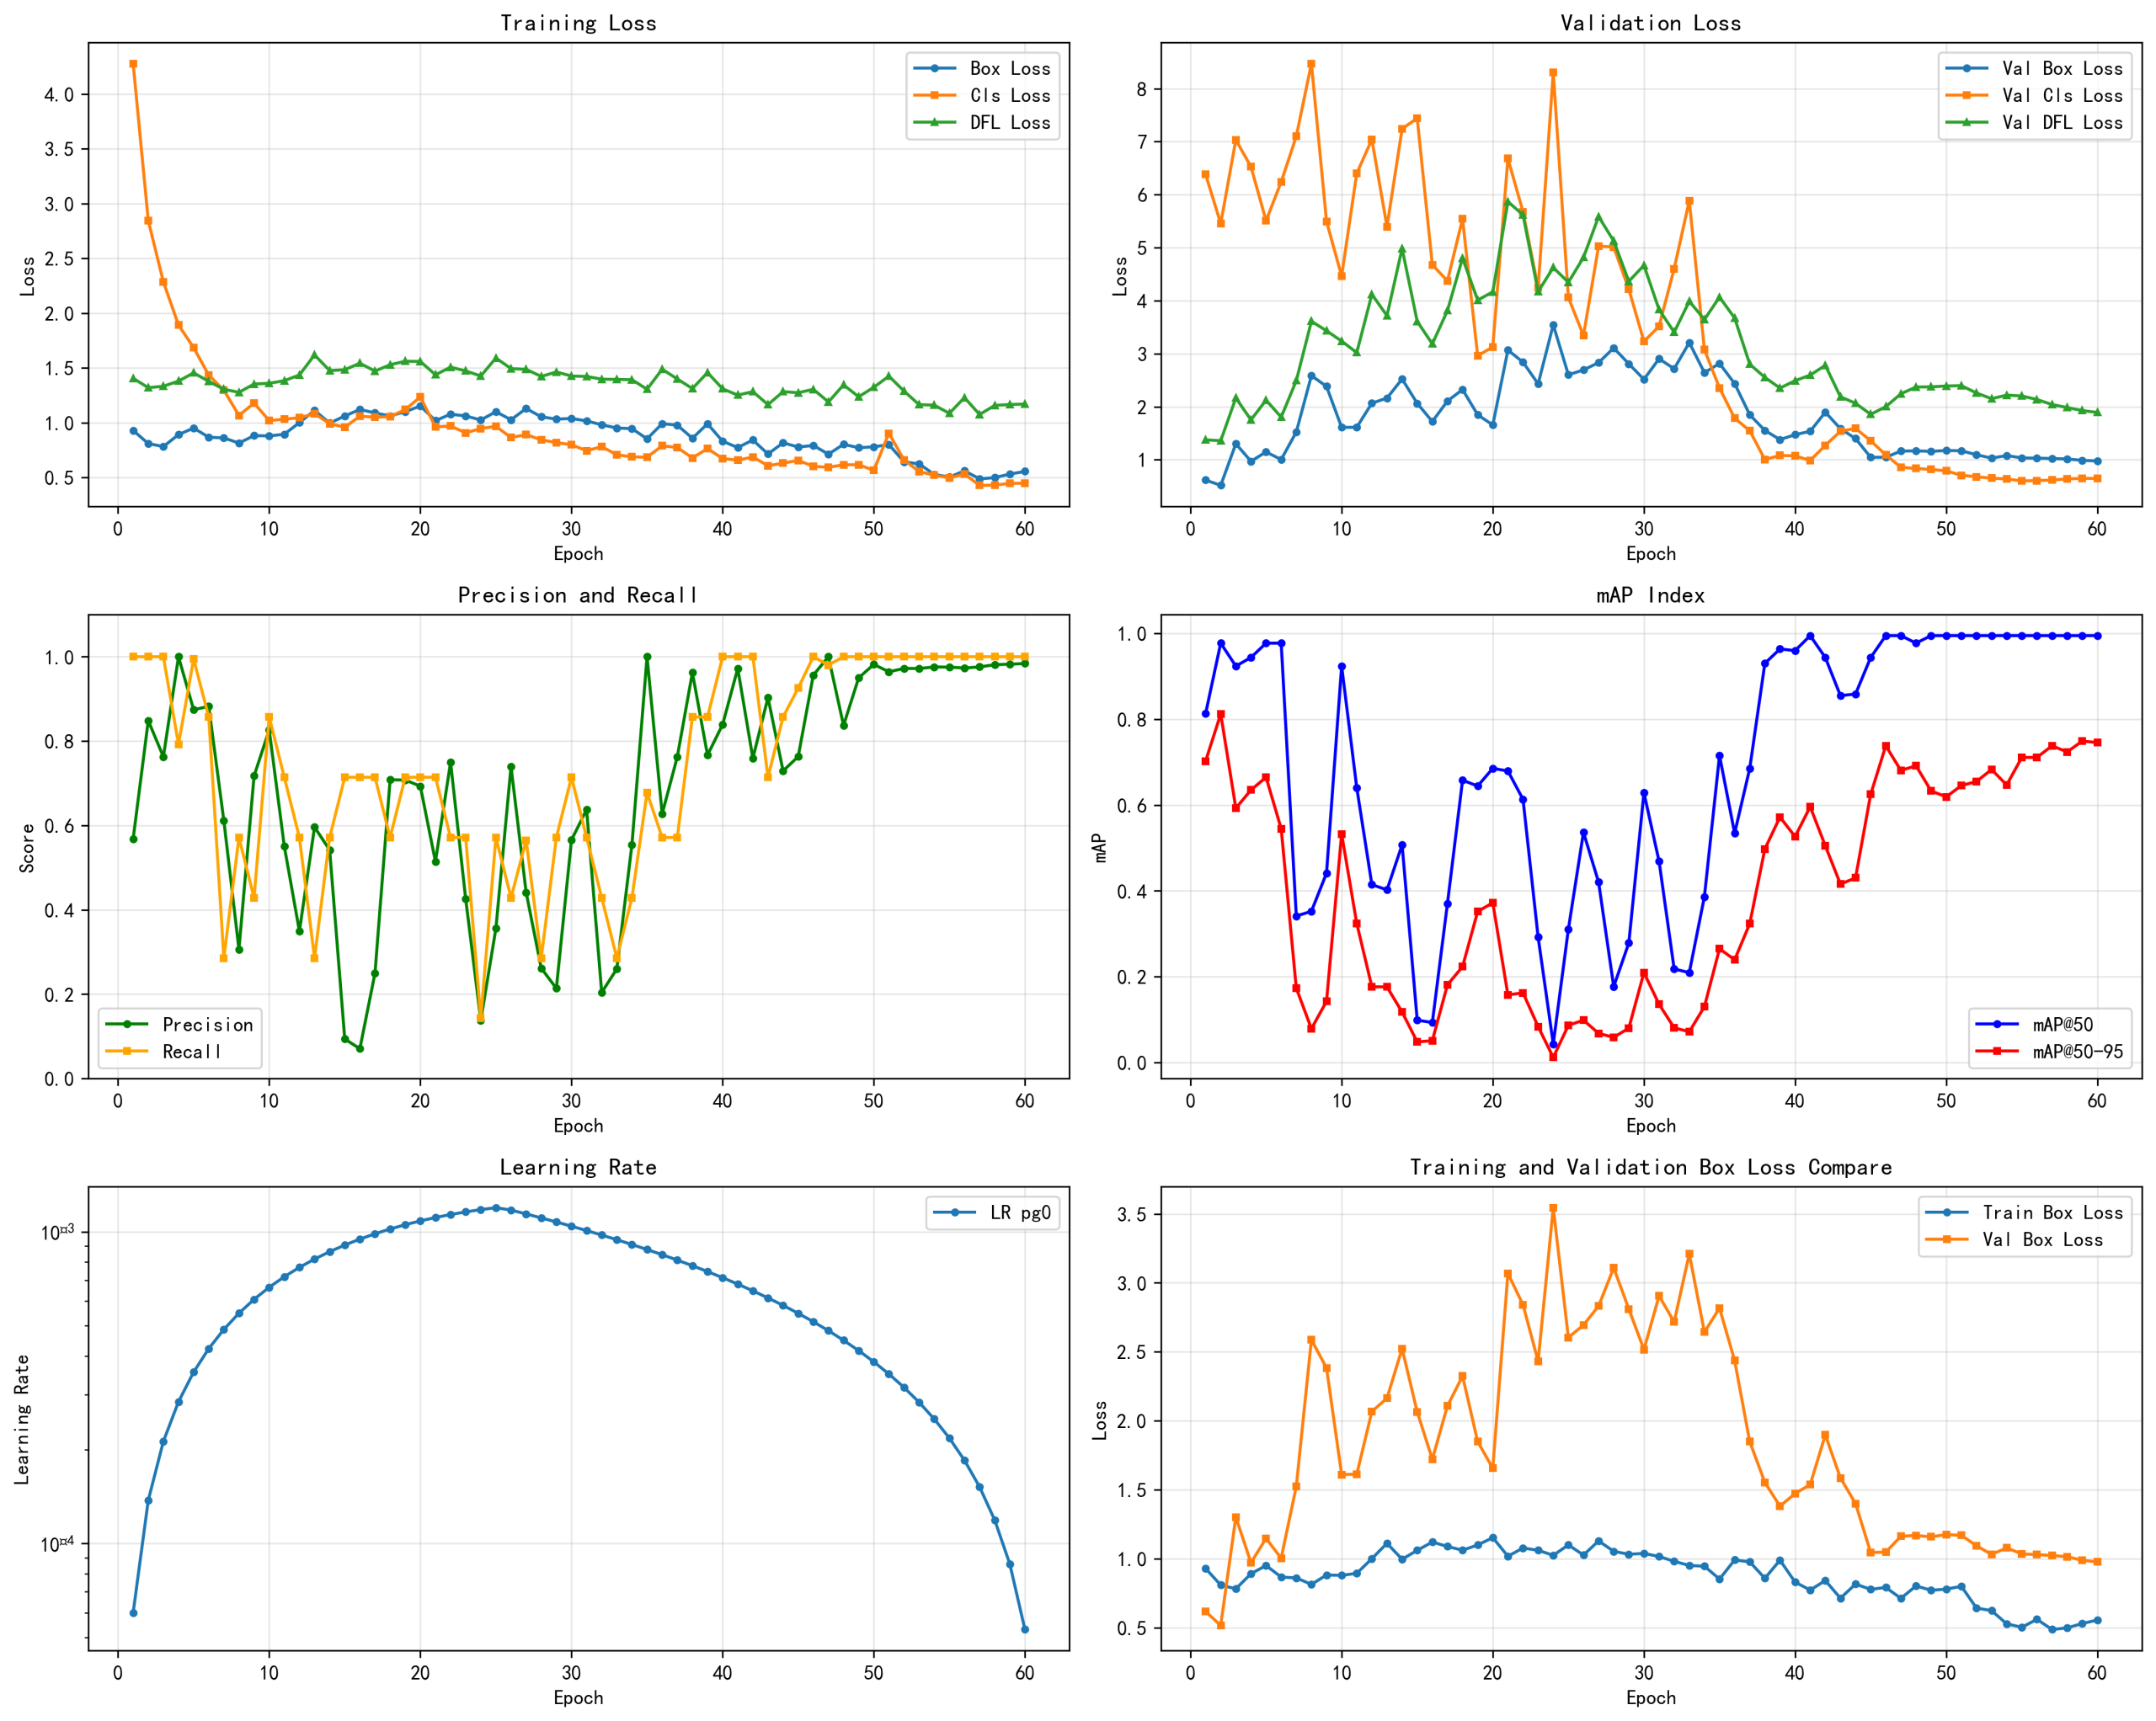
这次的训练从那个 mAP50 看:最佳 mAP50:-->0.995(接近100%)出现在 大概第 41 epoch 这说明:模型几乎“从不漏检”目标;而从 mAP50-90 看:最佳 mAP50-90:-->0.8 出现在 大概第 1 个 epoch , 后续却一直下降并再也没有超过0.8,这意味着:模型几乎能检测到目标却狂框不准 ---> 框和目标贴得不够准确;
但是从 *Train Loss 和 *Val Loss来看,存在比较严重的过拟合现象
- 看到训练损失下降 --> 模型在学习
- 看到验证损失上升 --> 开始过拟合
- 看到 mAP50-95 在第 2 轮就达到峰值 --> 过早停止泛化
- 看到 mAP50 接近 1.0 但 mAP50-95 只有 0.75 --> 模型在死记硬背
- 看到训练集和验证集差距大 --> 没有泛化能力
具体可查看下图:
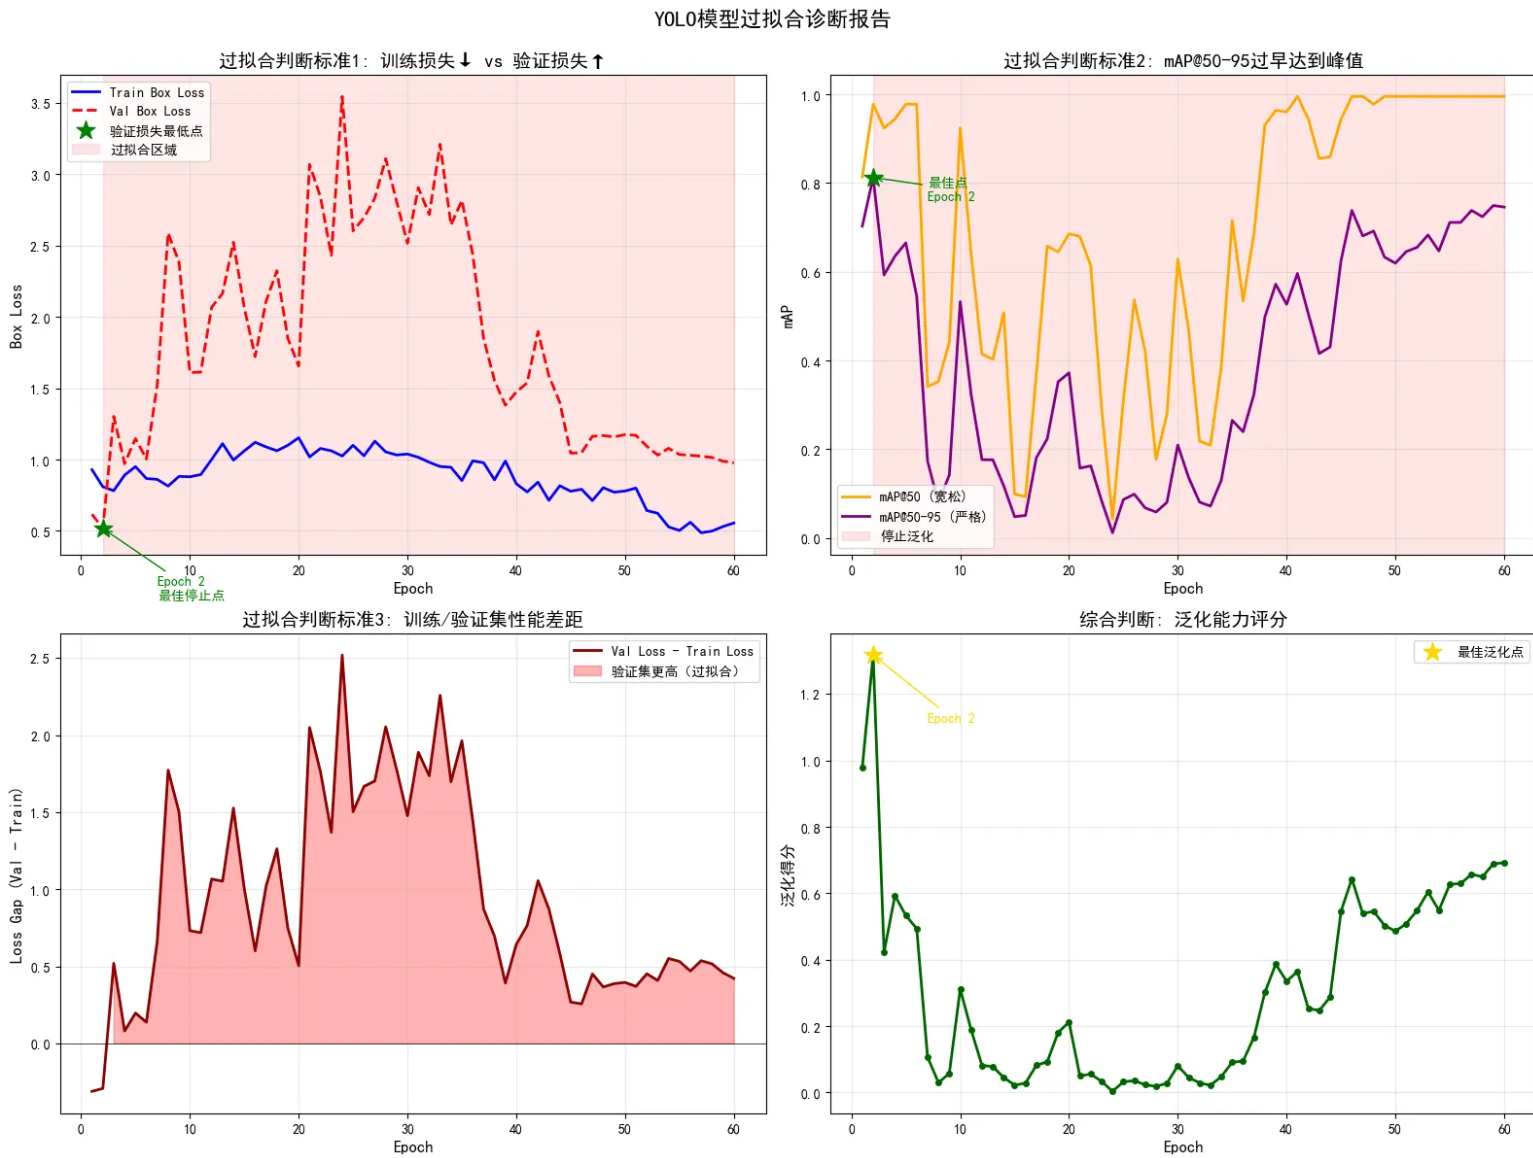
所以整体来看,此次训练的模型:【找到猫的能力很强】,【但是框“准”的能力比较差】,【在复杂环境下框错的可能性比较大】;但是考虑到训练样本数量较少,而且训练数据中的场景也比较单一,这个结果【可以】接受,因为我们此次的目标是:只要检测出来就行。
9. 实际推理和测试
python: 查看笔记即可;
cpp:需要注意【YOLO的版本】,不同版本的YOLO加载方式有所不同。即:如果在微调时,使用的 base model 是 YOLOv5 , 则微调模型的加载方式也需要与 YOLOv5一致,其余版本同理。
以 v5 为例:
cpp文件-->【yolov5_cpp_inference.cpp】 更多 --> 【ultralytics-example】
onnx文件 -->【best.onnx】
#include <iostream>
#include <opencv2/opencv.hpp>
#include <opencv2/dnn/dnn.hpp>
#include <string>
#include <vector>

using cv::Mat;
using std::cout;
using std::endl;
using std::string;
using std::vector;
// 前处理
// 推理
// 后处理:筛除置信度过低的目标,按类别分类并得到类别编号,筛除重复度过高的框,结束

// 筛除重复度过高的框策略1:拿到置信度最高的框,把剩下的去掉
// 筛除重复度过高的框策略2:拿到置信度最高的框,看剩下的框是否重复,重复过多就删除,也就是所谓的nms

static const vector<string> class_name = {"cat", "chicken", "cow", "dog", "fox", "goat", "horse", "person", "racoon", "skunk"};


// letterbox resize: 保持比例缩放 + 填充
cv::Mat letterbox(const cv::Mat& src, int new_size = 640) {
    int original_w = src.cols;
    int original_h = src.rows;

    // 计算缩放比例
    float scale = std::min((float)new_size / original_w, (float)new_size / original_h);
    int new_w = int(original_w * scale);
    int new_h = int(original_h * scale);

    // resize 到新尺寸
    cv::Mat resized;
    cv::resize(src, resized, cv::Size(new_w, new_h));

    // 创建目标图 (640x640, 黑色背景)
    cv::Mat output = cv::Mat::zeros(new_size, new_size, src.type());

    // 计算填充偏移
    int top = (new_size - new_h) / 2;
    int left = (new_size - new_w) / 2;

    // 将缩放后的图像复制到中心
    resized.copyTo(output(cv::Rect(left, top, new_w, new_h)));

    return output;
}

void print_result(const Mat &result, float conf = 0.7, int len_data = 15)
{
    float *pdata = (float *)result.data;
    for (int i = 0; i < result.total() / len_data; i++)
    {
        if (pdata[4] > conf)
        {
            for (int j = 0; j < len_data; j++)
            {
                cout << pdata[j] << " ";
            }
            cout << endl;
        }
        pdata += len_data;
    }
    return;
}

vector<vector<float>> get_info(const Mat &result, float conf = 0.7, int len_data = 15)
{
    float *pdata = (float *)result.data;
    vector<vector<float>> info;
    for (int i = 0; i < result.total() / len_data; i++)
    {
        if (pdata[4] > conf)
        {
            vector<float> info_line;
            for (int j = 0; j < len_data; j++)
            {
                // cout << pdata[j] << " ";
                info_line.push_back(pdata[j]);
            }
            // cout << endl;
            info.push_back(info_line);
        }
        pdata += len_data;
    }
    return info;
}

void info_simplify(vector<vector<float>> &info)
{
    for (auto i = 0; i < info.size(); i++)
    {
        info[i][5] = std::max_element(info[i].cbegin() + 5, info[i].cend()) - (info[i].cbegin() + 5);
        info[i].resize(6);
        float x = info[i][0];
        float y = info[i][1];
        float w = info[i][2];
        float h = info[i][3];
        info[i][0] = x - w / 2.0;
        info[i][1] = y - h / 2.0;
        info[i][2] = x + w / 2.0;
        info[i][3] = y + h / 2.0;
    }
}

vector<vector<vector<float>>> split_info(vector<vector<float>> &info)
{
    vector<vector<vector<float>>> info_split;
    vector<int> class_id;
    for (auto i = 0; i < info.size(); i++)
    {
        if (std::find(class_id.begin(), class_id.end(), (int)info[i][5]) == class_id.end())
        {
            class_id.push_back((int)info[i][5]);
            vector<vector<float>> info_;
            info_split.push_back(info_);
        }
        info_split[std::find(class_id.begin(), class_id.end(), (int)info[i][5]) - class_id.begin()].push_back(info[i]);
    }
    return info_split;
}

void nms(vector<vector<float>> &info, float iou = 0.4)
{
    int counter = 0;
    vector<vector<float>> return_info;
    while (counter < info.size())
    {
        return_info.clear();
        float x1 = 0;
        float x2 = 0;
        float y1 = 0;
        float y2 = 0;
        std::sort(info.begin(), info.end(), [](vector<float> p1, vector<float> p2)
                  { return p1[4] > p2[4]; });
        for (auto i = 0; i < info.size(); i++)
        {
            if (i < counter)
            {
                return_info.push_back(info[i]);
                continue;
            }
            if (i == counter)
            {
                x1 = info[i][0];
                y1 = info[i][1];
                x2 = info[i][2];
                y2 = info[i][3];
                return_info.push_back(info[i]);
                continue;
            }
            if (info[i][0] > x2 or info[i][2] < x1 or info[i][1] > y2 or info[i][3] < y1)
            {
                return_info.push_back(info[i]);
            }
            else
            {
                float over_x1 = std::max(x1, info[i][0]);
                float over_y1 = std::max(y1, info[i][1]);
                float over_x2 = std::min(x2, info[i][2]);
                float over_y2 = std::min(y2, info[i][3]);
                float s_over = (over_x2 - over_x1) * (over_y2 - over_y1);
                float s_total = (x2 - x1) * (y2 - y1) + (info[i][0] - info[i][2]) * (info[i][1] - info[i][3]) - s_over;
                if (s_over / s_total < iou)
                {
                    return_info.push_back(info[i]);
                }
            }
        }
        info = return_info;
        counter += 1;
    }
}

void print_info(const vector<vector<float>> &info)
{
    for (auto i = 0; i < info.size(); i++)
    {
        for (auto j = 0; j < info[i].size(); j++)
        {
            cout << info[i][j] << " ";
        }
        cout << endl;
    }
}

void draw_box(Mat &img, const vector<vector<float>> &info)
{
    for (int i = 0; i < info.size(); i++)
    {
        cv::rectangle(img, cv::Point(info[i][0], info[i][1]), cv::Point(info[i][2], info[i][3]), cv::Scalar(0, 255, 0));
        string label;
        label += class_name[info[i][5]];
        label += "  ";
        std::stringstream oss;
        oss << info[i][4];
        label += oss.str();
        cv::putText(img, label, cv::Point(info[i][0], info[i][1]), 1, 2, cv::Scalar(0, 255, 0), 2);

    }
}

int main()
{
    cv::dnn::Net net = cv::dnn::readNetFromONNX("best.onnx");
    Mat img = letterbox(cv::imread("fox.jpg"), 640);
    cv::resize(img, img, cv::Size(640, 640));
    bool result1 = cv::imwrite("test.png", img);
    Mat blob = cv::dnn::blobFromImage(img, 1.0 / 255.0, cv::Size(640, 640), cv::Scalar(), true);
    net.setInput(blob);
    vector<Mat> netoutput;
    vector<string> out_name = {"output"};
    net.forward(netoutput, out_name);
    Mat result = netoutput[0];
    print_result(result);
    vector<vector<float>> info = get_info(result);
    info_simplify(info);
    vector<vector<vector<float>>> info_split = split_info(info);
    // cout << " split info" << endl;
    // print_info(info_split[0]);
    // cout << info.size() << " " << info[0].size() << endl;

    for(auto i=0; i < info_split.size(); i++)
    {
        nms(info_split[i]);
        draw_box(img, info_split[i]);
    }

    // nms(info_split[0]);
    // cout << "nms" << endl;
    // print_info(info_split[0]);
    // draw_box(img, info_split[0]);
    cv::imshow("test", img);
    cv::waitKey(0);
    return 0;
}
10. 部署
待板子ready
Gone with the flow
Comments NOTHING